Build LFTP on Mac OS X Lion

If you’re a seasoned Linux SysAdmin, you’ll miss LFTP. It’s a really powerful FTP client. Yes, you can also install it using MacPorts or Fink but right now, this is much quicker for me.

Here’s how I built LFTP 4.3.6 on my MacBook Pro. For the record, I’m on 10.7.3

Prerequisite: Apple developer tools (Xcode)

1. Download The GNU Readline Library (The library that came with OS X will not work). This is how I built Readline 6.2:

$ cd /where/readline/was/extracted
$ ./configure --prefix="/usr/local" --disable-shared && make && sudo make install

This will build a static library and install in it /usr/local

2. Make sure the library (libreadline.a) was built successfully in /usr/local/lib

3. Download LFTP and build it:

$ cd /where/lftp/was/extracted
$ CXXFLAGS="-O0 -Wall -fno-exceptions -fno-rtti -fno-implement-inlines" \
LDFLAGS="-Xlinker -search_paths_first -L/usr/local/lib" \
CPPFLAGS="-I/usr/local/include" \
./configure --with-openssl --disable-shared --disable-nls
$ make && sudo make install

In the lftp configure line, the “-Xlinker -search_paths_first” is necessary so that the linker will not prefer the system shared /usr/lib/libreadline.dylib to the static libreadline.a we just compiled.

The final binary will be installed into your /usr/local/bin/lftp and if your build was successful you should be able to run “lftp” and get the prompt:

lftp :~>

My LFTP version:

LFTP | Version 4.3.6 | Copyright (c) 1996-2012 Alexander V. Lukyanov
 
LFTP is free software: you can redistribute it and/or modify
it under the terms of the GNU General Public License as published by
the Free Software Foundation, either version 3 of the License, or
(at your option) any later version.
 
This program is distributed in the hope that it will be useful,
but WITHOUT ANY WARRANTY; without even the implied warranty of
MERCHANTABILITY or FITNESS FOR A PARTICULAR PURPOSE.  See the
GNU General Public License for more details.
 
You should have received a copy of the GNU General Public License
along with LFTP.  If not, see <http: //www.gnu.org/licenses/>.
 
Send bug reports and questions to the mailing list lftp at uniyar.ac.ru.
 
Libraries used: Readline 6.2, Expat 2.0.1, OpenSSL 0.9.8r 8 Feb 2011, libiconv 1.11, zlib 1.2.5

Good luck!

Perhaps some of you arrived by searching for “error: ‘rl_kill_full_line’ was not declared in this scope”. Yep, the above steps should help you.

VirtueMart Custom Login Module in Joomla!

Here’s a short article on making a simple module to include on your Joomla! pages that displays login / logout links. I’m a Joomla! newbie so there might be better ways to accomplish this.

I was helping a friend-client to accomplish redirection to the same page after logout.

Here’s the basic code that you need to have in a module with the Jumi extension:

< ?php
    $user=& JFactory::getUser();
    if (!$user->guest)
        echo '<a href="index.php?option=com_user&task=logout&return=Lw">Logout</a>';
    else
        echo '<a href="index.php?page=account.index&option=com_virtuemart">Login</a>';
?>

The code above will redirect users to the root or uppermost level of the website.

Let’s say that your website is http://www.yourwebsite.com/ and your shopping page with VirtueMart is installed at a subfolder http://www.yourwebsite.com/shop/

The question is simply where you want your user to end up after logging out. If you need your users to end up at http://www.yourwebsite.com/ then you’re good to go. If you want your users to be redirected to the shop or a thank you page, here’s where you need to be a little creative.

You need to replace that “Lw” in the logout link to a different string. “Lw” is the base 64 representation of the character “/”. So this means that the user will be redirected to / which is http://www.yourwebsite.com/

A solution I came out with:

1
2
3
4
5
6
7
8
< ?php
    $redirect_to = '/shop/';
    $user=& JFactory::getUser();
    if (!$user->guest)
        echo '<a href="index.php?option=com_user&task=logout&return=' . base64_encode($redirect_to) . '">Logout</a>';
    else
        echo '<a href="index.php?page=account.index&option=com_virtuemart">Login</a>';
?>

So only line 2 needs to be changed. Let’s say you want users to be redirected to http://www.yourwebsite.com/thankyou.html here’s how you will change line 2:

2
    $redirect_to = '/thankyou.html';

If you’d like your users to simply be redirected to the same page where they clicked the logout link, here’s what you should do to line 2:

2
    $redirect_to = $_SERVER['REQUEST_URI'];

That’s simply it. At first, I totally forgot that I can use PHP’s base64_encode so I ended up confusing my friend with an online encoder so that he can replace the “Lw”.

One annoying thing that I wasn’t able to solve is the login page always displays the error message:

Error: You do not have permission to access the requested module.

I think Joomla! is trying to load VirtueMart too early and I can’t make it go away. Looking at the Internet a lot of other websites has this message displayed. If you know how this message can be removed without hacking the CSS or source code, please let me know and I’ll give you credit.

References:

  1. http://forum.virtuemart.net/index.php?topic=88802#msg290906
  2. http://forum.joomla.org/viewtopic.php?p=1457876

Leverage Browser Caching

In the previous post I wrote about enabling compression for your pages so that they would load faster to the visitor. Today I’m going to write about how you can make use of browser caching to save some bandwidth.

Some people told me that their ISP or hosting provider requested that they upgrade the hosting plan or subscribe for more bandwidth. Since this site doesn’t have that much traffic, I wouldn’t know.

However recently I was able to help on a website which has a lot of visitors compared to this site. Around 14-18 visitors per minute on a working day and the bandwidth usage was very high, more than a gigabyte per day.

For the website, I saw that there were many requests for images (photos). The images aren’t that big anyway, around 100KB each but the amount of request made it significant.

Armed with knowledge of mod_expires, I added the following clauses to .htaccess while hoping that the server has the module installed. The following configuration is minimal, and Google Pagespeed actually suggests for 1 week.

<ifmodule mod_expires.c>
        ExpiresActive On
        ExpiresByType image/gif "access plus 2 hours"
        ExpiresByType image/png "access plus 2 hours"
        ExpiresByType image/jpg "access plus 2 hours"
        ExpiresByType image/jpeg "access plus 2 hours"
        ExpiresByType text/css "access plus 2 hours"
        ExpiresByType application/javascript "access plus 2 hours"
        ExpiresByType application/x-javascript "access plus 2 hours"
</ifmodule>

Although I know why Google Analytics set its expiry to 2 hours, it’s kind of amusing since the suggestion comes from another Google product. Oh well I am allowed to be amused right?

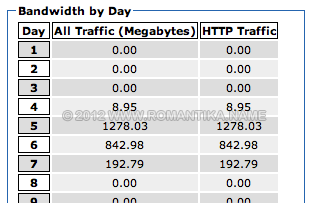
So let’s get to the results. Here are the bandwidth graphs from both days. I enabled mod_expires at around 6PM on 5 January 2012.

We can’t really see the difference by looking at the graphs. Google Analytics shows that there are at least 200 more visits on 6 January 2012. The numbers? Here you go:

At least 400MB were saved by this technique. You can actually put specific settings for each folder in your website. For example 2 hours is nice for cosmetic images which may need to be changed frequently but not for photos. For example if you run a photography website, you can even make your photos to expire in 1 year!

What mod_expires does is actually telling the browser that the resource (images) will expire on a specific date. It’s flexible enough to set the date from the access time. Here is the link to the official manual page for mod_expires.

Please be careful to note that this is not a quick solution for the lazy. You must think hard enough to set the proper amount of time before the images expire otherwise normal users will not see your changes or updates to the image until the cache on their browsers expire!

Good luck!

SMTP Smart Host Setup for Postfix in Snow Leopard

snow-leopard

PHP does not have any SMTP authentication mechanism in its configuration, and most developer opt for PEAR packages to perform email sending via custom ports and SMTP authentication.

I am one of those who will avoid using external packages as much as possible unless really necessary, and of course because I wanted a quick solution to my problem (or an excuse to be lazy).

By default, PHP sets SMTP as localhost and port 25. Under normal circumstances, this should be no issue as the built in Postfix will just connect to the destination server and delivers the mail. However, if your ISP blocks outgoing packets to port 25, the mail will go nowhere.

1. Enabling Postfix on Snow Leopard

Postfix is not enabled by default. You may choose to run it by default on system startup.

$ sudo vi /System/Library/LaunchDaemons/org.postfix.master.plist

Add before the closing </dict> tag:

  <key>RunAtLoad</key>
  <true />
  <key>KeepAlive</key>
  <true />

Start Postfix:

sudo launchctl
launchd% start org.postfix.master

You can test by using telnet on port 25 if you speak SMTP protocol.

2. Configuring Postfix to use a Smart Host

A smart host is also called a relay. This means that you need an SMTP account somewhere in the Internet to send the mail for you. With spam problems, open relays are identified in databases and are blocked by destination servers, so this means that legitimate mail servers requires authentication.

I used my Yahoo! SMTP account to help me send my test emails. Yahoo! allows for PLAIN authentication. The not so good thing about this method is that your password is transmitted plain text.

GMail is more secure and requires TLS authentication and this requires postfix to have SSL support but since I need this quick I have no time to research and find out whether it is. (Excuses, excuses).

i. Create a storage file for the password, for example /etc/postfix/relay_passwd

plus.smtp.mail.yahoo.com USERNAME:PASSWORD

ii. Secure the config file

$ sudo chmod 600 /etc/postfix/relay_passwd

iii. Create the hash database for postfix

$ sudo postmap /etc/postfix/relay_passwd

iv. Configure /etc/postfix/main.cf:

relayhost = [plus.smtp.mail.yahoo.com]:587 
smtp_sasl_auth_enable = yes  
smtp_sasl_password_maps = hash:/etc/postfix/relay_passwd  
smtp_sasl_security_options =

v. Restart Postfix

sudo launchctl
launchd% stop org.postfix.master
launchd% start org.postfix.master

You should be all set. Test sending an email from PHP.

BTW, if you’re wondering, if you are a Yahoo! Mail web user, chances are that you don’t have SMTP access. However, I have heard that some countries still do have free SMTP access for now.

PHP Debugging on PDT using Xdebug, with PHP packaged in XAMPP

It has been a while since I posted something technical so here goes. This article is meant for someone who has done PHP development before, and already has a web server and a working PHP installation.

Traditionally in the old days these are the things that I do to debug my PHP code:

  • Put in extra echo statements that print variable values. It’s easy to miss them when actually deploying the code to production
  • Use “here I am” echo statements to identify positions in the script. These are also easy to miss
  • Modify php.ini to verbosely display every error or warning messages. While this is not a concern on development boxes, it might be a problem on production servers
  • Using custom self-made loggers or something from PEAR or PHPClasses to have a log file written for debugging purpose. This method takes a toll on the time required to actually go through the log which might contain lots and lots of information

A commercial alternative to Xdebug is Zend Studio Web Debugger. Zend’s solution is quite a bit on the pricy side but it’s also supported out of the box by PDT.

Prerequisites

  1. PHP installation. I use XAMPP since it’s clean and it’s quick to set up. If you like to live on the bleeding edge with all the latest updates you can install PHP properly in your system either by using the installer or the zip package
  2. Eclipse installation. I use Aptana Studio
  3. Web server application such as Apache or IIS. I use Apache.
  4. PDT (PHP Development Tools) as a plugin for Eclipse/Aptana.

The debugger

The procedure to configure the debugger is not that different between Zend Studio Web Debugger or Xdebug. I am going to make an example of using Xdebug here.

While Windows users are able to download Xdebug binary and use it immediately, *NIX users have to compile it. Luckily I found that ASPN provides binaries to use with their Komodo IDE (yes, I am lazy to setup binutils and compilers). The zip file contains extension for PHP 4.4-5.3 (at the moment this article was written).

  1. Download Xdebug binary from the ASPN site mentioned above. Extract it to a temporary folder and choose the version corresponding to your PHP version. (Hint: to find your PHP version you can create a PHP file containing < ?php phpinfo(); ?> and view it through your web server)
  2. Copy xdebug.so to the extensions folder. You can also find out where is your extension folder by looking at the phpinfo output, under header “Core” and Directive “extension_dir”.
  3. Edit php.ini (or create an .ini file in php.d depending on your configuration) to include the following:
    [xdebug]
    zend_extension="/full/path/to/your/extension/dir/as/shown/in/phpinfo/xdebug.so"
  4. Restart your web server and you should be able to see xdebug listed in the phpinfo output

*Note: As you might have realized by now, phpinfo(); can be your best friend. It can also be your worst enemy if you put it in a production server, with a super simple name like phpinfo.php as it contains a lot of sensitive information about the server.

Configuring PDT

There are 3 main settings to focus on, to enable debugging in PDT.

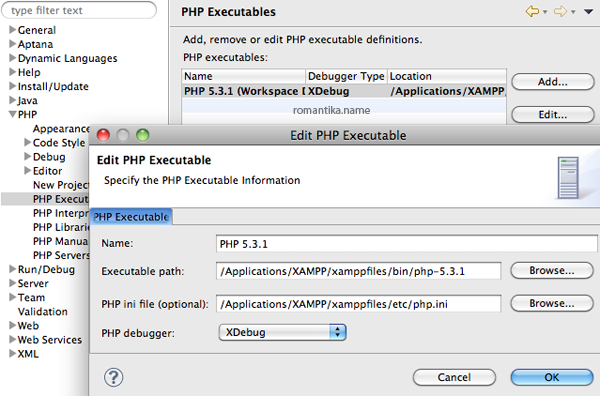
1. PHP Executables

pdt-php-executables

As I mentioned earlier, I am using XAMPP. As long you point this to the working PHP installation corresponding to where you install Xdebug, you’ll be fine.

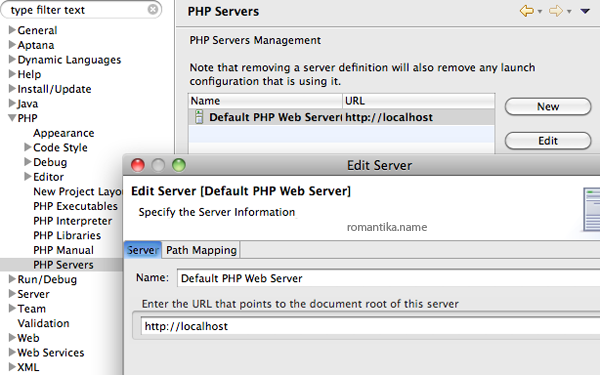
2. PHP Server & Path Mapping

pdt-php-server

This is where you specify your web server.

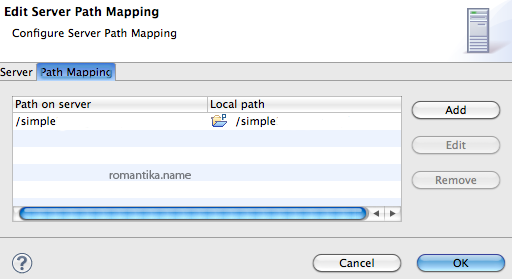
pdt-php-server-mapping

Mapping is used to tell the debugger the path of the files accessible via the web server and the corresponding path in your workspace.

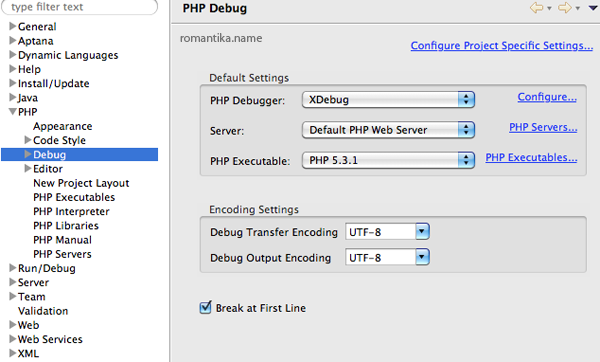
3. PHP Debug

pdt-php-debug

The options are self-explanatory. You’ll have to select the Server and Executable that you have configured. The default port for Xdebug is 9000 so if you decide to change your Xdebug port remember to change it here too.

Conclusion

Debugging using an IDE is a great way to save time, and to step into your application. If you have done everything correctly, you may use Eclipse/Aptana to debug your PHP files now (Menu > Run > Debug > Run as…) and you’ll get prompted to switch to the PHP Debug Perspective.

Good luck!

Image Hotlink Protection

Have people been stealing images from your websites? Well, there are not so many interesting images in this site so I don’t really have that problem. You can add a watermark to your image, but I guess everyone knows that.

Another form of image theft also involves bandwidth theft. It’s has many names – hotlink, inline linking, leeching, and many others. As many of us uses shared hosting and we have limited bandwidth, it will eventually reach the barrier if bandwidth is being stolen from other sites.

I have 1.5TB monthly bandwidth limitation, but I still don’t agree to people stealing my bandwidth by hotlinking images especially since I host quite a number of sites in this account. On Apache hosting it’s easy to prevent hotlinking by utilizing .htaccess file:

RewriteEngine On
RewriteCond %{HTTP_REFERER} !^http://(.+\.)?yourdomain\.com/ [NC]
RewriteCond %{HTTP_REFERER} !^$
RewriteRule .*\.(jpe?g|gif|bmp|png)$ /nohotlink.pne [L]

WordPress users can add the above lines before the WordPress rewrite rule:

# BEGIN WordPress

What the configuration does is check whether HTTP_REFERER to match the specified domain, or if it’s empty (direct calls, for example). If not empty and unmatched it sends the content of file /nohotlink.pne to the browser. Why? Because when images are loaded with the <img tags the referrer is the page calling the image. You can also define a nonexistent image so that a broken icon is displayed on the hotlinker’s site, or better still replace the last line with:

RewriteRule .*\.(jpe?g|gif|bmp|png)$ - [F]

My implementation will cause the image to be replaced with:

Hotlink protection

By the way the hotlink protection image is named with the .pne extension to prevent an infinite rewrite to occur. You can also use other image formats, and any other extensions. Some fussy browser might not display it correctly but who cares, the point is to prevent people from hotlinking, isn’t it?

Try it out yourself. Good luck!

Perl CGI + Apache + Windows

I have always thought it’s difficult to migrate Perl CGI script to Windows. I was wrong, and today I learned how to do it. The configuration part is actually 100% similar!

# This line will ensure only .cgi and .pl files are executed as CGI
AddHandler cgi-script .cgi .pl
 
Alias /request/ "C:/request/"
<directory "C:/request">
    AllowOverride None
    Options +ExecCGI
    Order allow,deny
    Allow from all
</directory>

Now, all .cgi and .pl files are executed as CGI when run from the /request URI. You might have seen the ScriptAlias directive before – it processes everything in the specified directory as CGI. As an example:

ScriptAlias /request/ "C:/request/"
<directory "C:/request">
    AllowOverride None
    Options None
    Order allow,deny
    Allow from all
</directory>

See the lack of the AddHandler directive? It’s no longer needed but it may be included if needed for other locations or directories. Now everything will be executed as a CGI. A CSS file in the directory will cause the server to return Error 500 (Internal Server Error).

One important thing when working with CGI is the shebang – the first line of the script that contains the full path to the interpreter. On Linux it looks like this:

1
#!/usr/bin/perl

While on Windows it will look like this:

1
#!C:/perl/bin/perl

This is the only problem with portability as you can’t have more than 1 shebang line!

Installing Perl is another part of the exercise. On Windows, the easiest way to get Perl is to install ActivePerl from ActiveState. If you’re migrating some code over to Windows, other than the Shebang you will need to install the required Perl modules. CPAN is available, but I suggest that you don’t use it unless very necessary. Since CPAN downloads the source code and tries to compile libraries, on a bare Windows system it’ll fail.

If you’re missing Perl modules you’ll see the error “Premature end of script” depending on how your Error 500 pages are configured. In Apache log, you’ll see:

[Fri Feb 13 10:00:21 2009] [error] [client 10.xx.yy.zz] Premature end of script headers: test.cgi
[Fri Feb 13 10:00:21 2009] [error] [client 10.xx.yy.zz] Can't locate DBD/mysql.pm in @INC (@INC contains: C:/Perl/lib C:/Perl/site/lib .) at C:\request/utils.pl line 7.

That’s when we need to use ppm utility provided with ActivePerl:

> ppm help
Type 'help command' for more detailed help on a command.
  Commands:
    describe   - describes packages in detail
    exit       - exits the program
    help       - prints this screen, or help on 'command'
    install    - installs packages
    .... snip ....

Based on the error above, it’s time to install DBD::MySQL module.

ppm install DBD-mysql

I’m all set!

Since we’re already talking about Perl, if you need mod_perl you can use ppm to install:

ppm install http://theoryx5.uwinnipeg.ca/ppms/mod_perl-2.0.ppd

At the end of the installation it’ll ask for your Apache’s module directory and copy mod_perl.so there.

The rest is easy:

LoadFile "C:/perl/bin/perl58.dll"
LoadModule perl_module modules/mod_perl.so
 
Alias /mprequest "C:\mprequest"
<location /mprequest>
     SetHandler perl-script
     PerlResponseHandler ModPerl::Registry
     Options +ExecCGI
     PerlOptions +ParseHeaders
</location>

Of course, PerlResponseHandler should be set depending on what you need.

Have fun with Perl!

Flash Uploader Error

I was using YUI Uploader for a personal project and it works very well on my development notebook and server. However when the code is live on the server the Flash uploader failed with this error message:

[IOErrorEvent type="ioError" bubbles=false cancelable=false eventPhase=2 text="Error #2038"]

After a while I realized that it must be something server-side because when I used WireShark to see the traffic the server returns Error 500. The traffic is not captured by Firebug because it is Flash traffic.

The culprit is ModSecurity, a third party module used by most hosting companies. ModSecurity is a web application firewall that can work either embedded into Apache or as a reverse proxy.

A quick fix to allow uploads is to include these in the .htaccess file. These handle different Apache and ModSecurity versions and since we include the IfModule directive if the module is unavailable no error will be thrown. This relieves the need to consider what version of Apache and ModSecurity is used on the server.

For this example the script that handles the upload is named upload.php.

# Apache 1.x and ModSecurity 1.x
<IfModule mod_security.c>
   <Files upload.php>
      SecFilterEngine Off
      SecFilterScanPOST Off
   </Files>
</IfModule>

# Apache 2.x and ModSecurity 1.x
<IfModule security_module>
   <Files upload.php>
      SecFilterEngine Off
      SecFilterScanPOST Off
   </Files>
</IfModule>

# Apache 2.x and ModSecurity 2.x
<IfModule security2_module>
   <Files upload.php>
      SecRuleEngine Off
      SecRequestBodyAccess Off
   </Files>
</IfModule>

That’s it! This fixes the Flash uploader problem.

By the way it might be useful to let you know that this issue was encountered on a server hosted under the Ebiz Linux package by Exabytes.

IE7 and document.body.scrollTop

After being nagged by my Windows Automatic Updates for quite some time, I finally decided to give in and just install the IE7 update. I made a mistake by not backing up my IE6 files, or trying to find a method to have IE6 co-exist with IE7.

Anyway, I found that the document.body.scrollTop method to find out how much of the page has been scrolled down doesn’t work anymore. Now I have to use document.documentElement.scrollTop. And since the only difference of IE7 and IE6 is reflected inside a long string in the navigator.appVersion or navigator.appName objects, a little Regular Expression has to be built.

Here is the snip I ended up with, to cater both IE6 and IE7:

switch(navigator.appName)
{
  case 'Microsoft Internet Explorer':
    var myregex = /MSIE 7\.0/i;
    var myArray = navigator.appVersion.match(myregex);
    if(myArray.length > 0) scrollY = document.documentElement.scrollTop;
    else scrollY = document.body.scrollTop;
  break;
  default:
    scrollY = window.pageYOffset;
}

Anyone found a better solution?