Let Apache Compress Your Website

Website speed is one of the most important factor to make people like to visit more. In 2008, I wrote Compressing WordPress Output and this is done by adding one line to index.php

The problem with that approach is that when you upgrade WordPress you have to manually add the line into index.php, and the technique does not improve loading time for administration pages.

Compressing is done on the fly by Apache, and it helps improve loading time because your browser receives smaller files. While some browsers were broken (they do not know how to handle compressed content), today’s browsers are much more efficient.

If your webhost allows you to add your own .htaccess then you can use this technique. Please note that you can do this for any type of website, not limited to WordPress.

<ifmodule mod_deflate.c>
     AddOutputFilterByType DEFLATE text/text text/html text/plain text/xml text/css application/x-javascript application/javascript
</ifmodule>

As simple as that. The directive above will ask Apache to compress text, html, xml, css, and javascript files before sending them to the browser. We don’t compress images because we don’t save much on image compression plus it will be too stressful for Apache.

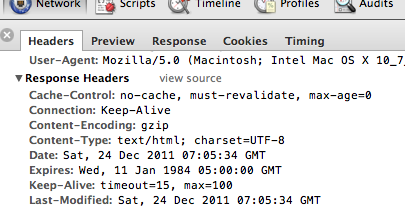
You can use Firebug or Chrome to actually verify whether your content is now zipped. You might have to clear your browser cache first otherwise the files will not be requested from the server. You should look for the content-encoding header and it should say “gzip”. To satisfy yourself, you might want to capture the size of the page (there should be a column for that) before and after you add the directives into .htaccess and you should be able to see a significant reduction in size.

If you don’t see gzip then the possibilities are either your webhost does not allow .htaccess or mod_deflate is not installed on the server. To see whether or not mod_deflate is installed on the server you can remove the 1st and 3rd line in .htaccess and refresh the page. If it’s not installed then you will see an error.

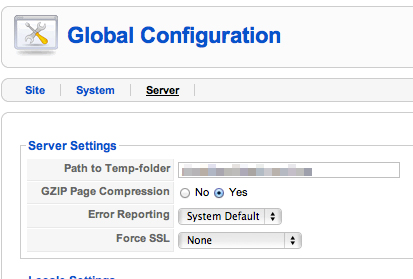
For Joomla! users, there’s an easier way to do it in the Global Configuration section:

Simple eh?

For WordPress, one might argue that they can change the parameter gzipcompression in the semi hidden configuration page http://www.yourblog.com/wp-admin/options.php but I tried it in WordPress 3.2.1 and it did not work. I read in WordPress forums, they removed this feature because Apache can handle it much better.

Go ahead and try it out. Your visitors will be thankful.

Sparrow and Shortmail

I’ve been pushing the limits of my mid-2010 13″ MacBook Pro lately, running all sort of applications and leaving them running. There has been occasions where the machine will freeze while it struggles to schedule the CPU time to all of the applications.

I use a lot of email, and by a lot I don’t mean 10 emails per day. No joke. The features of Apple Mail 5.0 are actually enough for my daily use but it does feel a little bit sluggish with 5 IMAP accounts.

Recently, I signed up to Shortmail via my Twitter account. The idea is nice. 500 characters max per email, straight to the point.

While casually browsing through my Twitter stream last night I saw people talking about setting up Sparrow to access Shortmail and sending attachments via Dropbox.

I was thinking, Shortmail is short, Sparrow is light. Combining them together should be nice… and since all of my email accounts are now running via IMAP, why not give Sparrow a try with Shortmail before using it for serious communications.

I downloaded Sparrow through the website to try it out, instead of buying it from the Mac App Store for $9.99

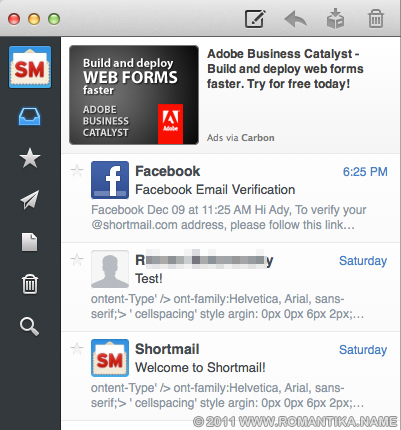
I was pleased that it only asked for my email address and password so I entered my Shortmail account details. It was nice. Shortmail’s logo was displayed on the screen. But it took ten minutes to sync my 3 messages. I don’t know what it was doing and I’m not sure whether the waiting time is caused by Shortmail servers or Sparrow itself.

One thing I hate the most is how markup is displayed in the preview lines in Sparrow. It’s not in Facebook’s email but markup are there for the first 2 emails.

I can understand if there are glitches in Shortmail as it’s still fresh but I don’t expect glitches from Sparrow. I wonder how long it would take for it to sync my gigs of emails from other email accounts. I can’t even imagine and I can’t afford to waste so much time.

Looks likes it’s going to be a while before I am convinced to try Sparrow again. I am glad I didn’t rush to buy the app for $9.99 in the Mac App Store. For now, I’m leaving it to AppZapper to cleanup!

Update 16 December 2011 11:15 AM GMT+8

Less than an hour ago, I received a shortmail from Shortmail telling me that they are working on a new version of their IMAP service that should make a difference. This is great news for those who prefer using Shortmail service via regular email clients. From @Shortmail‘s timeline I can see that they are responding to many users about improving the IMAP service.

Keep up the good work! By the way, my Shortmail address is romantikaname [at] shortmail [dot] com

Thanks for the shortmail! This is nice, and it shows that you are serious about what you do!

For the record, I was more disappointed with Sparrow displaying ugly markup on the preview pane.

Compiling flip on Mac OS X

I was looking for a simple utility that will work like dos2unix tool on Linux to convert endlines from DOS to UNIX. I was scraping some contents from a server running .NET and those ugly ^M characters appeared in vim.

I found this https://ccrma.stanford.edu/~craig/utility/flip/, downloaded the PPC binary and used it happily for a while.

That is until I upgraded to Lion. I am not an expert in Mac OS X yet, but since Lion took away Rosetta and PPC codes away I got this:

Launch of "flip" failed: the PowerPC architecture is no longer supported.

The “file” utility gave me this:

flip: Mach-O executable ppc

Since I have the old Xcode installed on my machine, I thought I’d try and build it since the source code (a single .cpp file) is provided at the URL above.

Here’s how I was able to build it:

g++ -ansi -O3 -o flip flip.cpp \
-I/Developer/SDKs/MacOSX10.6.sdk/usr/include/c++/4.2.1 \
-I/Developer/SDKs/MacOSX10.6.sdk/usr/include \
-I/Developer/SDKs/MacOSX10.6.sdk/usr/include/c++/4.2.1/x86_64-apple-darwin10 \
-L/Developer/SDKs/MacOSX10.6.sdk/usr/lib && strip flip

The three -I provided it with the include paths, and the -L provided the libraries for the binary to link to. To run the compilers, you need to add them to your PATH: /Developer/usr/bin

Now flip runs well:

Usage: ./flip [-t|-u|-d|-m] filename[s]
   Converts ASCII files between Unix, MS-DOS/Windows, or Macintosh newline formats
 
   Options: 
      -u  =  convert file(s) to Unix newline format (newline)
      -d  =  convert file(s) to MS-DOS/Windows newline format (linefeed + newline)
      -m  =  convert file(s) to Macintosh newline format (linefeed)
      -t  =  display current file type, no file modifications

And “file” recognizes it as:

flip: Mach-O 64-bit executable x86_64

If you have the new Xcode 4.1 (the one that Apple just released for free in App Store), you might need to change certain paths. You’ll have to look at the errors and adjust your parameters.

I am not sure whether my development tool paths were removed as a result of Lion upgrade, but I am currently downloading Xcode 4.1 to the machine. Let’s see whether it’ll automatically set the INCLUDE, LIB, and add the development tools into my PATH.

If it does, then compiling might even be as easy as:

g++ -ansi -O3 -o flip flip.cpp && strip flip

Good luck!

Used Nikon D50 Kit For Sale

Since Mudah.my has decided to be Susah.my (again) I have decided to post this item here, on my own blog. This is my old DSLR, fully functioning and very much loved. It’s for sale as I have upgraded to a faster camera suitable for shooting children in normal and low lighting conditions.

Here’s the same text I posted in Facebook and Mudah:

Nikon D50 kit (with 18-55mm lens)

Shutter Count: ~17636
Purchased on 1 August 2006

Great camera for beginners, and 2nd body for slow moving or static subjects. Tough body, no defect in function. Complete box, including *expired* warranty card and manuals.

Reason for selling: upgrade.

I love this camera but I am unable to bring 2 bodies out, and it has been sitting in the dry box for more than a month. Such a waste for a such beautiful body.

COD/view in Cyberjaya/Putrajaya only. You may request other areas if reasonable.

Serious buyers only please. Send me an email: ady at romantika dot name

Sorry, I don’t dare to ship internationally. If you want it shipped to other states, I might be able to consider it but you’ll need to cover the shipping cost.

Here’s a link to the public Facebook album (visible to everyone) containing this camera and other used items for sale.

Problems Saving Alerts in MyProfiles

Let’s face it. iPhone/iPad “new mail” alerts sucks and if you have multiple email accounts set up you’ll never know which account received the new email.

When you’re driving or having a meal, it’s convenient to know whether the email is from your boss, is an important alert from a system dying somewhere, or just your friend saying hi.

I’m not saying that you should procrastinate replying emails from friends, but those kinds of emails are just not worth crashing into the road divider or choke on chicken bone or something. Joking.

There might be some other tweaks or tools but I decided on MyProfiles. That’s the best I can find.

It works fine until one night I turned the phone into silent mode (via hardware switch) and the alert sound still played! I was surprised. At first I thought that I forgot to disable the alert override (Override Silent) item but I was wrong. It’s stuck at ON no matter how many times you try.

Override silent is a useful feature, trust me but I don’t want all of my alerts to sound all night long.

The quickest way I found was to edit the configuration directly. The configuration file is at: /var/mobile/Library/Preferences/com.intelliborn.myprofiles.plist

< ?xml version="1.0" encoding="UTF-8"?>
< !DOCTYPE plist PUBLIC "-//Apple//DTD PLIST 1.0//EN" "http://www.apple.com/DTDs/PropertyList-1.0.dtd">
<plist version="1.0">
<dict>
	<key>allAlerts</key>
	<array>
		<dict>
			<key>alertDuration</key>
			<integer>1800</integer>
			<key>alertId</key>
			<integer>1</integer>
			<key>alertInterval</key>
			<integer>300</integer>
			<key>alertVolume</key>
			<integer>0</integer>
			<key>displaySummary</key>
			<integer>1</integer>
			<key>filterMailboxesArray</key>
			<array>
				<string>EmailAccount1</string>
			</array>
			<key>global</key>
			<integer>1</integer>
			<key>ignoreRingerState</key>
			<integer>0</integer>
			<key>mailToMeOnly</key>
			<integer>0</integer>
			<key>name</key>
			<string>COMPANY</string>
			<key>repeatAlert</key>
			<integer>0</integer>
			<key>sound</key>
			<integer>1</integer>
			<key>soundPath</key>
			<string>/System/Library/Audio/UISounds/sms-received2.caf</string>
			<key>type</key>
			<integer>1</integer>
			<key>vibrate</key>
			<integer>1</integer>
		</dict>
	</array>
</dict>
</plist>

You’ll need to change the key to 0, near the line:

			<key>ignoreRingerState</key>
			<integer>0</integer>

I don’t know how to restart the daemon as this is not a springboard app. I also don’t know whether restarting the springboard will take the new configuration.

So what I did was just launch MyProfiles again and then tried to edit the alert configuration. What I found out was that the configuration for override silent is untouched and even if I play around with it, it still won’t change from the new state I manually entered in the XML file. I also restarted the engine just to be sure.

But hey, it worked and when in silent mode the alert no longer play any sound.

* To do this you need to have SSH enabled on your iPhone/iPad. Hey if you’re using MyProfiles that means you have jailbreak your device anyway…

First IKEA Hacking Project: VIKA AMON and LACK

My better half and I have been looking for a nice table as surface in our large kitchen but we couldn’t find any nice ones. Even IKEA products are too simple or too expensive. She found a website that she likes very much, IKEA Hackers and has been showing me many designs since.

For her birthday we decided to do some IKEA hacking project. She will design and I will make it. As an artsy crafty person she designed things very easily but as someone who has only done woodwork in high school, it’s a proven challenge for me.

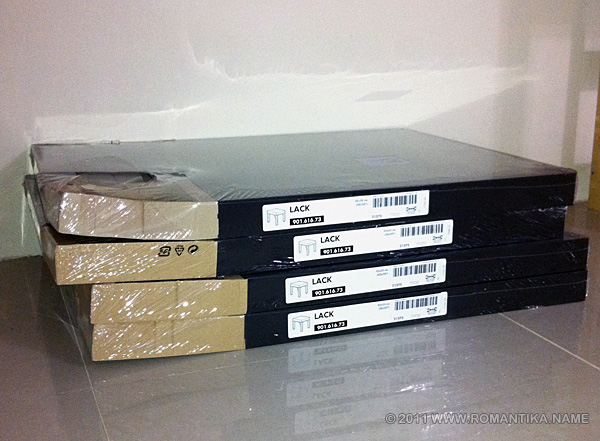
We decided to use 4 LACK side tables code 901.616.73 measuring 56x56cm and 1 VIKA AMON table top code 501.622.26 measuring 150x75cm. Total cost for this project including screws and brackets was RM240 (around US$80 at that time).

IKEA LACK side tables

First, the LACK tables were assembled normally by screwing the 4 legs onto the top according to IKEA’s manual. They are arranged by the wall to see how they look:

As I have never worked on wood before, it proved difficult for me to find supplies of brackets and suitable screws to put the project together. I finally found some usable parts at a local DIY store. To attach 2 LACK on the same row together, I used 2 L shaped flat metal piece. I didn’t manage to take a picture after attaching them but you’ll be able to see it in the following picture.

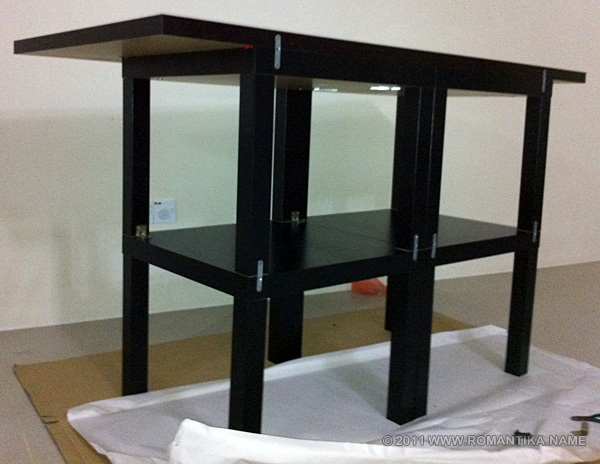
Here’s a picture after they have been attached. Note that at this moment the top row and the bottom row aren’t connected yet as I wanted to be able to easily attach the huge VIKA AMON top first.

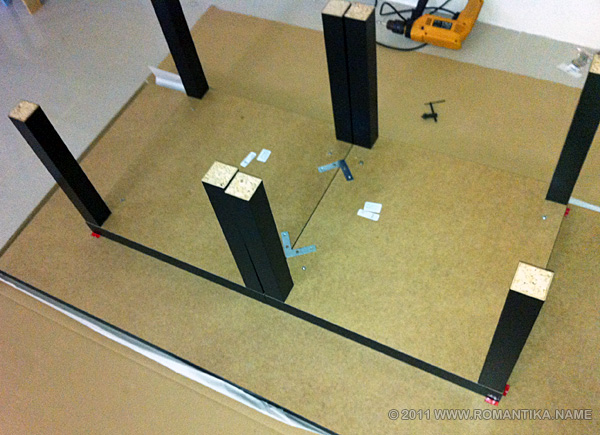
Here’s a view on how 2 LACK on the same row are attached using the L flat bracket. The red 3M tapes you see are just used to make sure the LACK tables stay put on the VIKA AMON table after I made the measurements.

The top is attached by screwing the tables from below, using 2.5″ wood screws with washers. It wasn’t an easy job because LACK tables have paper support inside and are hollow. I used 8 screws to fix the top.

After I was satisfied with the attachment strength it was time to attach the bottom row of the LACK tables. Ransacking through my IKEA box I found flat brackets from GORM so I used them at what supposedly to be the behind of the table (facing the wall).

A useful tip here is to offset a little from center when driving the screw near the LACK table top as you might hit the original screw that holds the feet together. You don’t want that, those screws are heavy duty. I broke a bit on my power drill.

At the legs of the inner side, I used L metal brackets to attach the top and bottom row together.

Here’s the (almost) final product. We plan to have some gypsum board covering for the sides and back but we are yet to find (and decide) on where we should get the supplies.

While we’re at that maybe we’ll look for nice wallpapers to cover the side and back boards.

Well that’s it. I hope you enjoyed reading.

Shrinking VirtualBox Disk Images

On my MacBook Pro with minimal disk size (250GB) I had to install VirtualBox in order to run any kind of Windows, for emergency cases. I was able to install Windows Server 2008 in a 20GB dynamically expanding virtual disk image (VDI).

A couple of months back I also made a clone of my HP NX9010 hard disk, a Seagate Momentus 80GB drive using the dd utility and attach it to the same virtual machine. I don’t have a lot of time at hand so this will enable me to selectively back up the files on that drive, when I have some free time. I use that old laptop to play videos for my child.

After some time, the Windows Server 2008 VDI grew up to 11GB and the Momentus VDI stayed at 74GB because dd was copying it bit by bit. I needed to free up more space. My target was the Momentus VDI because it’s huge and I have already deleted (backed up) a lot of files in it.

As their name suggest, they are dynamically expanding so they will not shrink themselves. In VMware, you can easily stumble upon the “shrink” button in the tool. In VirtualBox, we need to use the command line utility VBoxManage.

It’s as simple as:

VBoxManage modifyhd Seagate\ Momentus\ 80GB.vdi --compact

*VBoxManage is run on the host machine, while the virtual machine is powered off (not suspended).

Running it without any preparation work will shrink the VDI a bit, too insignificant to even notice.

And so I used SDelete to zero all the unused space on the VDI, and ran VBoxManage again. SDelete needs to be run inside the virtual machine while it’s running.

sdelete -c d:

I managed to get the 74GB VDI to shrink to 23GB. Now that’s a significant reduction in size.

Still, I was greedy. I wanted to know whether fragmentation has any effect on the shrink-ability of the VDI. So I went into the virtual machine, ran defrag, ran sdelete, then I executed VBoxManage to compact the VDI.

Below was my final result. From 74GB to 5.1GB I was fully satisfied. I was also able to shrink the 11GB VDI that contains the OS to 9.7GB.

If you have questions/suggestions/feedback, please leave a comment.

WordPress 3.1 Upgrade

I am not going to announce or talk about the release of WordPress 3.1 as I know that most people already know it was released on 23 February 2011. I am also not going to talk about the features.

I would like to share problems that I encountered and how to fix them. Well, I only had 2 problems so far. These are not encountered while upgrading this blog you’re reading.

The first was the problem with no post on the main page. Depending on your theme, it might say, “Sorry no post matching your criteria”. Just after an upgrade, it’s scary to think that all posts are gone. But yeah I still have my backup.

Before you blame WordPress and jump to Blogger or such, you need to check whether you have disabled all of your plugins. Most often plugins are the reason errors occur after an upgrade. In each release, API and functions changes and while WordPress developers try to avoid backward compatibility issues, some of them are just inevitable.

The culprit for my problem was a sticky post plugin. In haste, I deleted all traces of the plugin on the server and in my local disk. Additionally I was working on another machine so I can’t recall the name of that plugin right now.

This was an upgrade from version 2.6. I heard that an upgrade from 2.6 to 2.7 will also produce the same problem by this plugin.

Sometimes, people do get totally blank page. The smartest thing to do is to enable WP_DEBUG in wp-config.php

define('WP_DEBUG', true);

While this line is not available in pre-3, it’ll work if you add it.

It’s also beneficial for the plugin issue I mentioned above. That’s how I found out that there’s a SQL error produced by that plugin.

The next problem I encountered was related to the database version. This might be published somewhere in WordPress documentation but I failed to find it. WordPress 3.1 requires MySQL 4.1.2 and above.

This was a manual upgrade from WordPress 2.8.4 via FTP. The good thing is that the public facing site was still working fine. I was just unable to access the administration dashboard.

By the way, my hosting provider has dedicated database servers with MySQL 4.0 – 5.0 options. 4.0 has been obsolete and this particular blog being upgraded was the only one using 4.0. So all I had to do was:

  • Create a new database in the 5.0 server
  • Export from 4.0 into a SQL file
  • Import into 5.0
  • Run the normal database upgrade screen

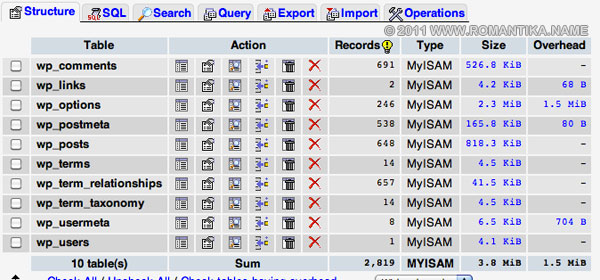
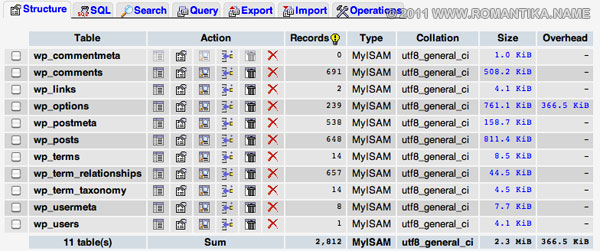
And everything was hunky-dory. It’s interesting to see that there are less total rows, and the addition of wp_commentmeta table:

Database for 2.8.4

Database for 3.1

If you are on normal cheap hosting with MySQL on the web server itself, you’re out of luck if the server only has MySQL 4.0. It’s time to move away.

So that’s it. Since there are a few more blogs in the upgrade process I might add more findings in this post as I come across them.

Good Bye MyBlogLog

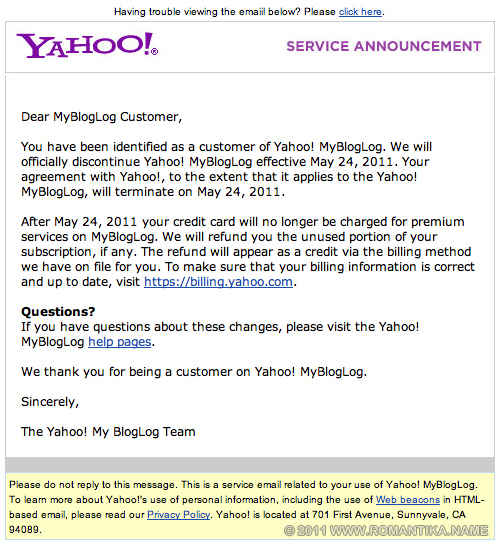
I have just received an email from Yahoo! announcing the end of MyBlogLog service. It’s going to be discontinued effective May 24, 2011. Nice of Yahoo! to give us some time before terminating it for good.

However the link for help pages redirected me to this page: http://help.yahoo.com/l/us/yahoo/ysm/ll/featured/index.html, which I think is a mistake because it’s for “Local Featured Listings”.

Nevertheless, we thank you Yahoo! for a great service.

Google Authenticator Rocks

OK, “Google Authenticator” is actually the name of the smartphone apps provided by Google. What is it all about? It’s two factor authentication similar to the ones banks use to authenticate users to log in or to perform transactions. Corporate users might also have the same security method using smart card or RSA SecurID to log in to machines or connect to VPN.

The basic idea is simple, you will need your password and the code provided by the apps so that if your password is compromised the malicious user will not be able to log into your account. Plus, you’ll always have your phone with you so you will have this code when you need it.

Here’s how the app looks like on the iPhone:

The code changes in a few seconds (there’s a timer pie on the left that moves to show how long will the code will stay).

This 6 digit code, will be asked when you log in to Google services from the web browser. Don’t worry it will not be every time if you select it to remember trusted machines. It’ll be remembered for 30 days and after that I think it will be asked again (I have just started using it today so I am just guessing the behavior).

Before you Begin

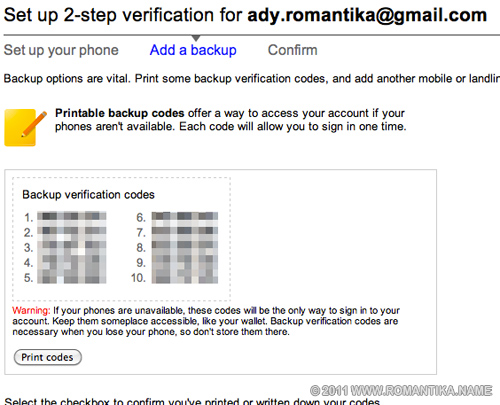
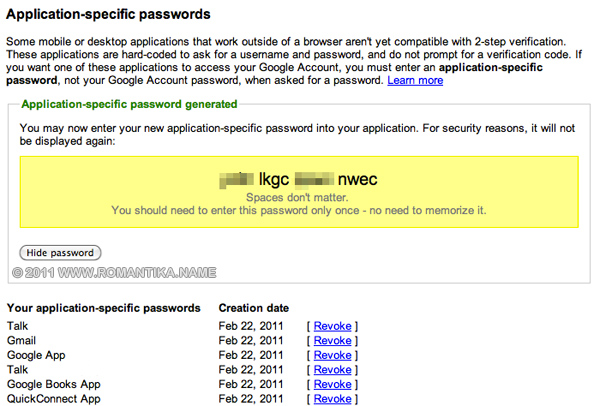
If you use Google services in various places such as in mobile applications (e.g. Google Mobile App), desktop applications (e.g. Google Talk), and other places where two factor verifications aren’t coded yet, you will need some time to set up application specific passwords for each of them so that they will still work. More on this below.

How To Start

It’s easy to activate. One will need to navigate to https://www.google.com/accounts/SmSAuthconfig and follow the on screen instruction.

Official step by step instruction from Google is available here.

It’s a very simple and quick process. Once activated, all other applications not using two factor authentication will automatically be denied access (login fails) and they need to use the application specific password discussed below.

What if I lose my smart phone?

Google thought of everything. Upon signing up, you will be receiving 10 emergency codes to keep safe. These codes need to be kept securely, but accessible, for example in your wallet. Each of them can only be used one time.

You’ll also have the option use a backup phone number for an emergency code to be sent to you via SMS or an automated voice service. Cool eh?

Application Specific Passwords

While setting up two factor authentication takes maybe 2 or 3 minutes, entering application specific passwords may take some time. They each are 12 characters in length. They are used for applications such as Thunderbird, Outlook, mobile mail, GTalk, IM+ mobile app, etc. and the list is endless.

But it’s not that painful, compared to the security it provides (says a paranoid man).

For pictures from other devices (BlackBerry and Android) please head here: TechCrunch: Google Rolls Out Two-Factor Authentication For Everyone. You Should Use It.

So what about you? Are you jumping on the bandwagon? You should. Tell me your experience below.

Mac OS X: Modifying Stubborn Files Transferred From Windows

This is related to the previous post, where I had a lot of checked out Subversion working copies in my disk. They came from a Windows machine I used before I bought myself a Mac.

For your information, in a Subversion working copy, there will always be a hidden folder named .svn in each directory, and a bunch of files in them. Many files in there are read-only on Windows, and on UNIX or Mac systems they have read permissions set (-r–r–r–). They are supposed to be that way and only a Subversion client can work on them.

When attempting to update my working directory, my Subversion client refused to update the files because it can’t write to .svn/entries

Tested on: Snow Leopard 10.6.6
Known to work as early as: Tiger 10.4.x

The issue is not related to permissions or even Subversion. For some kind of unknown reasons, when read-only files are transferred from Windows, there is a special flag set on Mac OS X – the user immutable flag. When this happens, you will be receiving these:

$ chmod u+w entries 
chmod: Unable to change file mode on entries: Operation not permitted

As root:

$ sudo chmod u+w entries
Password:
chmod: Unable to change file mode on entries: Operation not permitted

However, root can delete the files. But I don’t want the files to be deleted. I merely wanted to update (and later add new and modified files to the repository) my working copy.

The simple solution to this is to use the chflags command to unset the user immutable flag:

$ chflags -R nouchg *

As simple as that, and you will be able to operate on the files again. In my case, my “svn update” operation went as smooth as silk.

Remember, the permissions of the file does not even matter. Even if it’s world-writable -rwxrwxrwx

For the record, I transferred the file via a USB drive (NTFS file system), and I have received reports that this is the same case if you transfer from a file share (Samba or Windows File Sharing).

I hope this saved you some time.

Starting Subversion Service on Demand in Mac OS X

Since I moved to a new home I didn’t let my Linux servers run 24/7 so that I can save on electricity bills. It’s not so much about moving homes but it’s about the tariff increase. My 500W and 400W power supplies can easily reach the max usage of around 300W each which translates to around 432kWh per month, costing me around RM123.55 (source: TNB Tariff). Money that can be better spent for my gadgets, craft items for my wife, or toys for my kid.

The last time my Subversion repositories were used, was in Feb 2009. Since the repositories are just files, I can easily transfer them to my Mac to use locally. For me, file history and ability to revert changes are more important that using the repository as backup. My Mac is backed up using Time Machine anyway so I am pretty much safe. I am obsessed with file history and proper branching in source code, sometimes I think I have a mild version of OCD. Seriously.

OK, now on to the technical part. I am unsure on how my machine is pre-installed with CollabNet’s version, but you can install it on your Mac using one of the available packages listed in Apache’s official Subversion packages list.

Tested on: Snow Leopard 10.6.6
Known to work as early as: Tiger 10.4.x

My version:

svn, version 1.6.5 (r38866)
   compiled Jun 24 2010, 17:16:45
 
Copyright (C) 2000-2009 CollabNet.
Subversion is open source software, see http://subversion.tigris.org/
This product includes software developed by CollabNet (http://www.Collab.Net/).

Please take note that the method I am going to show here is to allow access to Subversion as a service via the network. I like to prepare for future use for example allowing access from other machines. You can always opt for local file based access, http, https, and svn+ssh (and you will not need to do the steps below).

On Mac, you can have services launched as a permanent process or on demand using launchd – System wide and per-user daemon/agent manager.

In this discussion we will be running svnserve on demand, similar to running services via inetd on Linux.

It is fairly straightforward. You need to create a .plist file similar to the one below. I named mine org.apache.subversion.svnserv.plist

1
2
3
4
5
6
7
8
9
10
11
12
13
14
15
16
17
18
19
20
21
22
23
24
25
26
27
28
29
30
31
32
33
34
35
36
37
38
39
40
41
42
43
44
45
46
< ?xml version="1.0" encoding="UTF-8"?>
< !DOCTYPE plist PUBLIC "-//Apple Computer//DTD PLIST 1.0//EN" 
"http://www.apple.com/DTDs/PropertyList-1.0.dtd"> 
<plist version="1.0">
<dict>
    <key>Debug</key>
    <false />
    <key>Disabled</key>
    <false />
    <key>GroupName</key>
    <string>staff</string>
    <key>Label</key>
    <string>org.apache.subversion.svnserv</string>
    <key>OnDemand</key>
    <true />
    <key>Program</key>
    <string>/usr/bin/svnserve</string>
    <key>ProgramArguments</key>
    <array>
        <string>svnserve</string>
        <string>--inetd</string>
        <string>--root=/Users/adyromantika/SVNRepository</string>
    </array>
    <key>ServiceDescription</key>
    <string>SVN Code Version Management</string>
    <key>Sockets</key>
    </dict><dict>
        <key>Listeners</key>
        </dict><dict>
            <key>SockFamily</key>
            <string>IPv4</string>
            <key>SockServiceName</key>
            <string>svn</string>
            <key>SockType</key>
            <string>stream</string>
        </dict>
    <key>Umask</key>
    <integer>2</integer>
    <key>UserName</key>
    <string>adyromantika</string>
    <key>inetdCompatibility</key>
    <dict>
        <key>Wait</key>
        <false />
    </dict>
</plist>

Things that need to be changed:

  1. Line 17: /usr/bin/svnserve needs to be changed to reflect your local installation.
  2. Line 22 needs to be changed to use your own repository root. This is not the name of the folder with “conf”, “db”, etc. folders but one folder up, so that your svnserve can serve multiple repositories.
  3. Line 11 is where you need to put the group name you want the svnserve process to run as. As you can see, I am lazy so I used the default group “staff”.
  4. Line 41 is where you need to put the username of you want the svnserve process to run as. I used my own user id which is not the best security practice but as I mentioned earlier, I am lazy.

Now that it’s done, copy the file to /Library/LaunchDaemons/ and run the command:

sudo launchctl load /Library/LaunchDaemons/org.apache.subversion.svnserv.plist

You are all set. Please note that since it’s launched on demand, you will not see the svnserve process running unless you are connected to the repository. You can simply use telnet to verify you get some kind of response:

adymac:~ adyromantika$ telnet localhost 3690
Trying 127.0.0.1...
Connected to localhost.
Escape character is '^]'.
( success ( 2 2 ( ) ( edit-pipeline svndiff1 absent-entries commit-revprops depth log-revprops partial-replay ) ) )

If you don’t get a response or “Unable to connect to remote host” you may want to check the file /etc/services and see whether these two lines are commented:

svn     3690/udp    # Subversion
svn     3690/tcp    # Subversion

Good luck. If you are having issues please comment below and I will try my best to help.
Tak Nak – Really?

Tak Nak“, literally translated to “Don’t Want” is a tag line for Malaysia’s anti smoking campaign. In true sense it means “Say No To Smoking”. It’s a collaboration between the Government and a few other organizations.

I was lucky enough to have some time to recently visit the National Zoo of Malaysia (locally known as Zoo Negara). For the record, I have not been there for more than 20 years. To my surprise, I was welcomed with cigarette smoke and cigarette butts everywhere. Since it’s an open park people seems to think that it is alright to smoke in public.

The only no smoking sign was found at the corner of the ticket counter, and even then the security guard was smoking 1.5 meters away (welcoming visitors with tobacco smell). I’m amazed on how undeveloped Malaysians minds are.

Yes, I do smoke but I don’t smoke in public attractions or even restaurants where kids and women are around.

I am not trying to make enemies or humiliate anyone, so I will be applying “mosaic” to the faces.

The tiny No Smoking sign is on the glass, top right corner:

Ticket counter B

Continue reading Tak Nak – Really?