SMTP Smart Host Setup for Postfix in Snow Leopard

snow-leopard

PHP does not have any SMTP authentication mechanism in its configuration, and most developer opt for PEAR packages to perform email sending via custom ports and SMTP authentication.

I am one of those who will avoid using external packages as much as possible unless really necessary, and of course because I wanted a quick solution to my problem (or an excuse to be lazy).

By default, PHP sets SMTP as localhost and port 25. Under normal circumstances, this should be no issue as the built in Postfix will just connect to the destination server and delivers the mail. However, if your ISP blocks outgoing packets to port 25, the mail will go nowhere.

1. Enabling Postfix on Snow Leopard

Postfix is not enabled by default. You may choose to run it by default on system startup.

$ sudo vi /System/Library/LaunchDaemons/org.postfix.master.plist

Add before the closing </dict> tag:

  <key>RunAtLoad</key>
  <true />
  <key>KeepAlive</key>
  <true />

Start Postfix:

sudo launchctl
launchd% start org.postfix.master

You can test by using telnet on port 25 if you speak SMTP protocol.

2. Configuring Postfix to use a Smart Host

A smart host is also called a relay. This means that you need an SMTP account somewhere in the Internet to send the mail for you. With spam problems, open relays are identified in databases and are blocked by destination servers, so this means that legitimate mail servers requires authentication.

I used my Yahoo! SMTP account to help me send my test emails. Yahoo! allows for PLAIN authentication. The not so good thing about this method is that your password is transmitted plain text.

GMail is more secure and requires TLS authentication and this requires postfix to have SSL support but since I need this quick I have no time to research and find out whether it is. (Excuses, excuses).

i. Create a storage file for the password, for example /etc/postfix/relay_passwd

plus.smtp.mail.yahoo.com USERNAME:PASSWORD

ii. Secure the config file

$ sudo chmod 600 /etc/postfix/relay_passwd

iii. Create the hash database for postfix

$ sudo postmap /etc/postfix/relay_passwd

iv. Configure /etc/postfix/main.cf:

relayhost = [plus.smtp.mail.yahoo.com]:587 
smtp_sasl_auth_enable = yes  
smtp_sasl_password_maps = hash:/etc/postfix/relay_passwd  
smtp_sasl_security_options =

v. Restart Postfix

sudo launchctl
launchd% stop org.postfix.master
launchd% start org.postfix.master

You should be all set. Test sending an email from PHP.

BTW, if you’re wondering, if you are a Yahoo! Mail web user, chances are that you don’t have SMTP access. However, I have heard that some countries still do have free SMTP access for now.
PHP Debugging on PDT using Xdebug, with PHP packaged in XAMPP

It has been a while since I posted something technical so here goes. This article is meant for someone who has done PHP development before, and already has a web server and a working PHP installation.

Traditionally in the old days these are the things that I do to debug my PHP code:

  • Put in extra echo statements that print variable values. It’s easy to miss them when actually deploying the code to production
  • Use “here I am” echo statements to identify positions in the script. These are also easy to miss
  • Modify php.ini to verbosely display every error or warning messages. While this is not a concern on development boxes, it might be a problem on production servers
  • Using custom self-made loggers or something from PEAR or PHPClasses to have a log file written for debugging purpose. This method takes a toll on the time required to actually go through the log which might contain lots and lots of information

A commercial alternative to Xdebug is Zend Studio Web Debugger. Zend’s solution is quite a bit on the pricy side but it’s also supported out of the box by PDT.

Prerequisites

  1. PHP installation. I use XAMPP since it’s clean and it’s quick to set up. If you like to live on the bleeding edge with all the latest updates you can install PHP properly in your system either by using the installer or the zip package
  2. Eclipse installation. I use Aptana Studio
  3. Web server application such as Apache or IIS. I use Apache.
  4. PDT (PHP Development Tools) as a plugin for Eclipse/Aptana.

The debugger

The procedure to configure the debugger is not that different between Zend Studio Web Debugger or Xdebug. I am going to make an example of using Xdebug here.

While Windows users are able to download Xdebug binary and use it immediately, *NIX users have to compile it. Luckily I found that ASPN provides binaries to use with their Komodo IDE (yes, I am lazy to setup binutils and compilers). The zip file contains extension for PHP 4.4-5.3 (at the moment this article was written).

  1. Download Xdebug binary from the ASPN site mentioned above. Extract it to a temporary folder and choose the version corresponding to your PHP version. (Hint: to find your PHP version you can create a PHP file containing < ?php phpinfo(); ?> and view it through your web server)
  2. Copy xdebug.so to the extensions folder. You can also find out where is your extension folder by looking at the phpinfo output, under header “Core” and Directive “extension_dir”.
  3. Edit php.ini (or create an .ini file in php.d depending on your configuration) to include the following:
    [xdebug]
    zend_extension="/full/path/to/your/extension/dir/as/shown/in/phpinfo/xdebug.so"
  4. Restart your web server and you should be able to see xdebug listed in the phpinfo output

*Note: As you might have realized by now, phpinfo(); can be your best friend. It can also be your worst enemy if you put it in a production server, with a super simple name like phpinfo.php as it contains a lot of sensitive information about the server.

Configuring PDT

There are 3 main settings to focus on, to enable debugging in PDT.

1. PHP Executables

pdt-php-executables

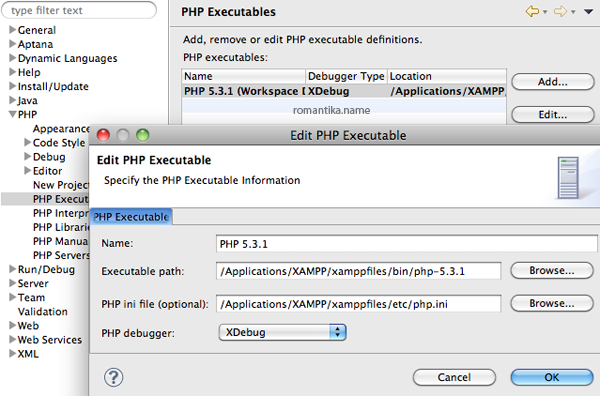
As I mentioned earlier, I am using XAMPP. As long you point this to the working PHP installation corresponding to where you install Xdebug, you’ll be fine.

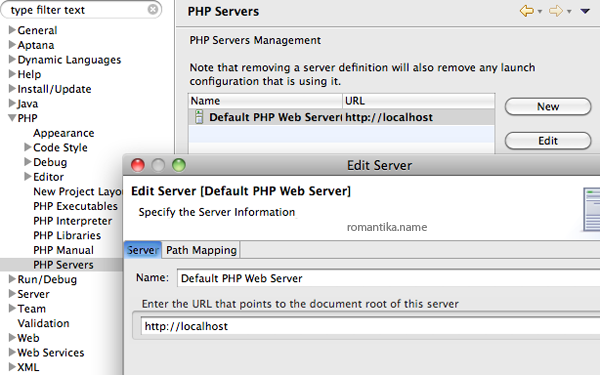
2. PHP Server & Path Mapping

pdt-php-server

This is where you specify your web server.

pdt-php-server-mapping

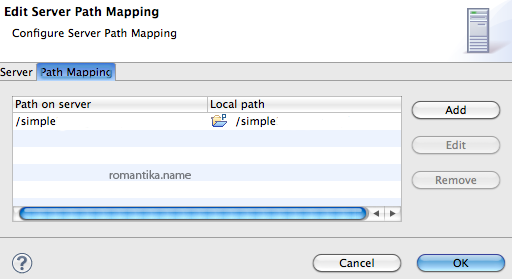
Mapping is used to tell the debugger the path of the files accessible via the web server and the corresponding path in your workspace.

3. PHP Debug

pdt-php-debug

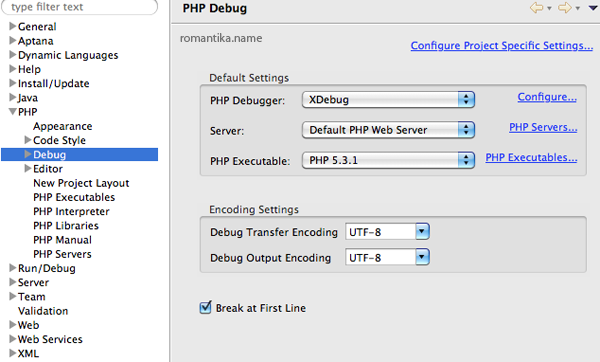
The options are self-explanatory. You’ll have to select the Server and Executable that you have configured. The default port for Xdebug is 9000 so if you decide to change your Xdebug port remember to change it here too.

Conclusion

Debugging using an IDE is a great way to save time, and to step into your application. If you have done everything correctly, you may use Eclipse/Aptana to debug your PHP files now (Menu > Run > Debug > Run as…) and you’ll get prompted to switch to the PHP Debug Perspective.

Good luck!

PHP Framework Benchmark

In April I wrote about Eclipse PDT, Zend Framework, PHPUnit.

AVNet Labs have executed a comprehensive benchmark against popular PHP Frameworks.

It looks like they are also using Zend Framework for their development. I’ll stay with Zend as well, because I believe in vendor-product compatibility. I will not ask for support from Adobe if I have a problem with Microsoft Visual Studio, so it’s the same concept here.

Zend is The PHP Company.

Thanks to Rizal for the heads up.

Eclipse PDT, Zend Framework, PHPUnit

I am currently in love and coding some personal projects using Eclipse PDT with the Zend Framework as foundation. Unit testing is accomplished using PHPUnit.

I love the ability of Eclipse to be extended with plugins so that I can have intelligent code completion and integrated subversion client. To my surprise, Eclipse runs very well on my seasoned 4 years old notebook.

I am a learner by practice so late last year I tried to penetrate the Ruby team at my company. However I didn’t make it because of company re-organization so requisitions were suspended (or something like that). I guess Ruby and I was just not meant to be together.

Eclipse PDT

Zend Framework really helps a lot in building applications really quick minus the bells and whistles of nice graphics. I am incompetent when it comes to creating nice graphics with Photoshop. 🙁

I am relatively very new to the MVC concept but I am very comfortable with it. It was just recently that I realize the importance of unit testing.

I must grab the unit testing concepts very quickly because I have just moved into a new role as a release engineer for a week. 🙂

On another development, I was also doing some Flash ActionScript 2.0 a couple of weeks ago and experimented on the XMLSocket object. The Flash movie connects to a server, and since I needed threading I decided to use Java. Eclipse is also superb with Java codes since I think it was originally meant to be a Java IDE.

Signing off.

PHP 5 In CentOS 4.5

Just a short sharing note, for users of CentOS 4.5 who is looking to update PHP to version 5 instead of the default 4.3.9 there is a clean and easy way to upgrade your PHP.

  1. Open up /etc/yum.repos.d/CentOS-Base.repo and look for the section centosplus:

    [centosplus]
    name=CentOS-$releasever - Plus
    mirrorlist=http://mirrorlist.centos.org/...
    #baseurl=http://mirror.centos.org/...
    gpgcheck=1
    enabled=0
    gpgkey=http://mirror.centos.org/centos/RPM-GPG-KEY-centos4
    priority=2
    protect=1

  2. Change enabled=0 to enabled=1
  3. Save the file
  4. Run yum update php*

And the rest is up to you… when it finishes restart Apache (service httpd restart) and you’ll be up and running with PHP 5.

How to check PHP version on the server?

Use rpm -qa | grep php and you’ll see the list of installed PHP packages. In this case PHP on the server has been upgraded to PHP 5.

php-pdo-5.1.6-3.el4s1.7
php-cli-5.1.6-3.el4s1.7
php-pear-1.4.11-1.el4s1.1
php-ncurses-5.1.6-3.el4s1.7
php-mbstring-5.1.6-3.el4s1.7
php-pgsql-5.1.6-3.el4s1.7
php-gd-5.1.6-3.el4s1.7
php-odbc-5.1.6-3.el4s1.7
php-common-5.1.6-3.el4s1.7
php-5.1.6-3.el4s1.7
php-snmp-5.1.6-3.el4s1.7
php-ldap-5.1.6-3.el4s1.7
php-mysql-5.1.6-3.el4s1.7
php-devel-5.1.6-3.el4s1.7
php-xmlrpc-5.1.6-3.el4s1.7
php-imap-5.1.6-3.el4s1.7
php-xml-5.1.6-3.el4s1.7

Good luck!

PHP 4 End Of Life

PHP Logo

PHP 4 will finally reached its end of life on December 31, 2007. However critical security fixes will be made available until August 8, 2008.

This is a good time to revise your codes, to see whether they will run without any glitches in PHP 5. That first, then when doing any code upgrades or improvements do consider PHP 5 features and functions for your code. This page lists all changes that are not backward compatible in PHP 5.

As you can see, your code styling and implementation greatly effects the outcome of your code. For example the function array_merge in PHP 4 is loose and accepts any variable to be merged into an array, but in PHP 5 if the supplied variable is not an array PHP will throw you a warning (E_WARNING). It is strict. If you have always made sure that your code is strict, that is to always provide an array to be merged, then you can sit back and relax.

That is one example of a changed function, and there are some additions to the available functions as well. Be very careful to observe the changes to object handling in PHP 5.

If you are managing a server, do consider installing PHP 5 as a side, and test your existing systems thoroughly. If you use managed hosting, consider pushing your server provider to install PHP 5 for the same reason. Also make sure that if your provider wants to totally migrate to PHP 5 you are well informed. However, from my tests most of the systems that were developed in the PHP 4 era can still function well in PHP 5… but it is better to be safe than sorry.