Sluggish iChat, Messages, Terminal, and Others in Mac OS X Lion

After about 60 days using my MacBook Pro running Mac OS X Lion (10.7.3), I saw some sluggishness in some apps. At first, it was Messages (iChat replacement for Mountain Lion). It went unresponsive and displays the rainbow wheel for a few seconds, enough to annoy an impatient user.

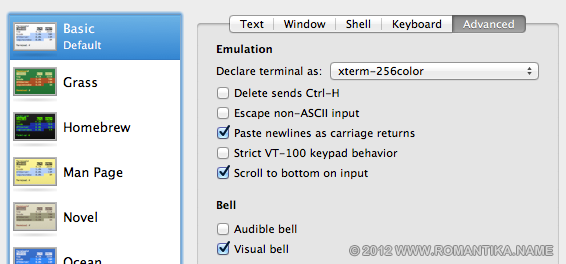
Then, the same behavior happened in Terminal. This is where I realize the common behavior. You know, when you press delete on an empty prompt, you get a bell. The default is the audible bell. When I change it to the visual bell, sluggishness disappeared.

On Messages, I had the default sound effect setting when messages are received or sent.

Boy was I right. In the log /var/log/system.log there were a bunch of these:

May  3 22:30:57 ADYMAC iChat[66352]: [Warning] Actions: Couldn't create SystemSound from /Applications/iChat.app/Contents/Resources/Received Message.aiff
May  3 22:31:07 ADYMAC iChat[66352]: [Warning] Unable to find a sound action ID for /Applications/iChat.app/Contents/Resources/Received Message.aiff  errorResult: 268435460
May  3 22:31:07 ADYMAC iChat[66352]: [Warning] Actions: Couldn't create SystemSound from /Applications/iChat.app/Contents/Resources/Received Message.aiff
May  3 22:31:17 ADYMAC iChat[66352]: [Warning] Unable to find a sound action ID for /Applications/iChat.app/Contents/Resources/Received Message.aiff  errorResult: 268435460

These are when I tried to change the system bell using the System Preferences application.

May 11 01:45:55 adymac System Preferences[44495]: Error 268435460 setting AlertSound
May 11 01:53:22 adymac System Preferences[44678]: Error 268435460 setting AlertSound
May 11 01:58:20 adymac System Preferences[44678]: Error 268435460 setting AlertSound
May 11 01:58:25 adymac System Preferences[44678]: Error 268435460 setting AlertSound

And so I tried a lot of things, including logging out then in, inspecting the file permissions, and also ran the verify permission utility on the hard disk using Disk Utility. Nothing worked.

Finally, I saw that there was one process called coreaudiod

_coreaudiod    45197   0.0  0.1  2453172   5228   ??  Ss   Fri02AM   0:10.52 /usr/sbin/coreaudiod

And so I tried killing it:

$ sudo killall coreaudiod

And as expected, it respawned itself and all audio effects were now working. Sluggishness and the dreaded rainbow wheel are gone.

Googling after, I saw that people mentioned that this may be a bug, and killing coreaudiod is only a workaround not the solution.

Come to think of it, it also caused unnecessary delay when making screen shots using the Command-Shift-4 key combination.

I hope this can save you some time.
Build LFTP on Mac OS X Lion

If you’re a seasoned Linux SysAdmin, you’ll miss LFTP. It’s a really powerful FTP client. Yes, you can also install it using MacPorts or Fink but right now, this is much quicker for me.

Here’s how I built LFTP 4.3.6 on my MacBook Pro. For the record, I’m on 10.7.3

Prerequisite: Apple developer tools (Xcode)

1. Download The GNU Readline Library (The library that came with OS X will not work). This is how I built Readline 6.2:

$ cd /where/readline/was/extracted
$ ./configure --prefix="/usr/local" --disable-shared && make && sudo make install

This will build a static library and install in it /usr/local

2. Make sure the library (libreadline.a) was built successfully in /usr/local/lib

3. Download LFTP and build it:

$ cd /where/lftp/was/extracted
$ CXXFLAGS="-O0 -Wall -fno-exceptions -fno-rtti -fno-implement-inlines" \
LDFLAGS="-Xlinker -search_paths_first -L/usr/local/lib" \
CPPFLAGS="-I/usr/local/include" \
./configure --with-openssl --disable-shared --disable-nls
$ make && sudo make install

In the lftp configure line, the “-Xlinker -search_paths_first” is necessary so that the linker will not prefer the system shared /usr/lib/libreadline.dylib to the static libreadline.a we just compiled.

The final binary will be installed into your /usr/local/bin/lftp and if your build was successful you should be able to run “lftp” and get the prompt:

lftp :~>

My LFTP version:

LFTP | Version 4.3.6 | Copyright (c) 1996-2012 Alexander V. Lukyanov
 
LFTP is free software: you can redistribute it and/or modify
it under the terms of the GNU General Public License as published by
the Free Software Foundation, either version 3 of the License, or
(at your option) any later version.
 
This program is distributed in the hope that it will be useful,
but WITHOUT ANY WARRANTY; without even the implied warranty of
MERCHANTABILITY or FITNESS FOR A PARTICULAR PURPOSE.  See the
GNU General Public License for more details.
 
You should have received a copy of the GNU General Public License
along with LFTP.  If not, see <http: //www.gnu.org/licenses/>.
 
Send bug reports and questions to the mailing list lftp at uniyar.ac.ru.
 
Libraries used: Readline 6.2, Expat 2.0.1, OpenSSL 0.9.8r 8 Feb 2011, libiconv 1.11, zlib 1.2.5

Good luck!

Perhaps some of you arrived by searching for “error: ‘rl_kill_full_line’ was not declared in this scope”. Yep, the above steps should help you.

Mac Messages Beta

Apple has just released the developer preview for OS X Mountain Lion yesterday and at the same time released the beta version of Messages, an upgrade of iChat. Here is the link to download Messages.

Installation is straight forward but you will be warned that the machine will need to be restarted. After installation, the spanking new icon will appear in the dock. The rightmost icon in the screenshot, not the middle one.

After installation (and configuration with your iCloud account), the familiar iChat UI will appear. Alongside with a new “iPad inspired” message list. Messages will continue to work with the existing accounts, just with additional features. As you can see in my screenshot my Google Talk (Jabber) account works fine.

I really wanted to know whether old messages from the iPhone will be imported. They were not. Which is no big deal. I’m not sure whether some background sync will happen while I use it. I’ll update if it does that.

I sent a test message to a buddy, Nazham:

At the same moment, my message and his reply appeared in both Messages for Mac and the iPhone. This is what Apple meant by “Start an iMessage conversation on your Mac and continue it on your iPad, iPhone, or iPod touch.”.

I love it.

Knowing Apple, Mountain Lion might be the only OS X I can upgrade my 2010 MacBook Pro with and I hope the price will be more or less like Lion.

Until next time, happy computing.

Sparrow and Shortmail

I’ve been pushing the limits of my mid-2010 13″ MacBook Pro lately, running all sort of applications and leaving them running. There has been occasions where the machine will freeze while it struggles to schedule the CPU time to all of the applications.

I use a lot of email, and by a lot I don’t mean 10 emails per day. No joke. The features of Apple Mail 5.0 are actually enough for my daily use but it does feel a little bit sluggish with 5 IMAP accounts.

Recently, I signed up to Shortmail via my Twitter account. The idea is nice. 500 characters max per email, straight to the point.

While casually browsing through my Twitter stream last night I saw people talking about setting up Sparrow to access Shortmail and sending attachments via Dropbox.

I was thinking, Shortmail is short, Sparrow is light. Combining them together should be nice… and since all of my email accounts are now running via IMAP, why not give Sparrow a try with Shortmail before using it for serious communications.

I downloaded Sparrow through the website to try it out, instead of buying it from the Mac App Store for $9.99

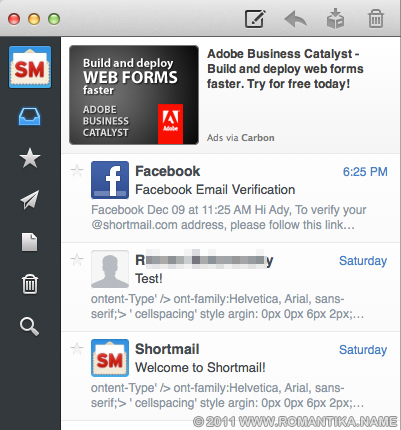
I was pleased that it only asked for my email address and password so I entered my Shortmail account details. It was nice. Shortmail’s logo was displayed on the screen. But it took ten minutes to sync my 3 messages. I don’t know what it was doing and I’m not sure whether the waiting time is caused by Shortmail servers or Sparrow itself.

One thing I hate the most is how markup is displayed in the preview lines in Sparrow. It’s not in Facebook’s email but markup are there for the first 2 emails.

I can understand if there are glitches in Shortmail as it’s still fresh but I don’t expect glitches from Sparrow. I wonder how long it would take for it to sync my gigs of emails from other email accounts. I can’t even imagine and I can’t afford to waste so much time.

Looks likes it’s going to be a while before I am convinced to try Sparrow again. I am glad I didn’t rush to buy the app for $9.99 in the Mac App Store. For now, I’m leaving it to AppZapper to cleanup!

Update 16 December 2011 11:15 AM GMT+8

Less than an hour ago, I received a shortmail from Shortmail telling me that they are working on a new version of their IMAP service that should make a difference. This is great news for those who prefer using Shortmail service via regular email clients. From @Shortmail‘s timeline I can see that they are responding to many users about improving the IMAP service.

Keep up the good work! By the way, my Shortmail address is romantikaname [at] shortmail [dot] com

Thanks for the shortmail! This is nice, and it shows that you are serious about what you do!

For the record, I was more disappointed with Sparrow displaying ugly markup on the preview pane.

Shrinking VirtualBox Disk Images

On my MacBook Pro with minimal disk size (250GB) I had to install VirtualBox in order to run any kind of Windows, for emergency cases. I was able to install Windows Server 2008 in a 20GB dynamically expanding virtual disk image (VDI).

A couple of months back I also made a clone of my HP NX9010 hard disk, a Seagate Momentus 80GB drive using the dd utility and attach it to the same virtual machine. I don’t have a lot of time at hand so this will enable me to selectively back up the files on that drive, when I have some free time. I use that old laptop to play videos for my child.

After some time, the Windows Server 2008 VDI grew up to 11GB and the Momentus VDI stayed at 74GB because dd was copying it bit by bit. I needed to free up more space. My target was the Momentus VDI because it’s huge and I have already deleted (backed up) a lot of files in it.

As their name suggest, they are dynamically expanding so they will not shrink themselves. In VMware, you can easily stumble upon the “shrink” button in the tool. In VirtualBox, we need to use the command line utility VBoxManage.

It’s as simple as:

VBoxManage modifyhd Seagate\ Momentus\ 80GB.vdi --compact

*VBoxManage is run on the host machine, while the virtual machine is powered off (not suspended).

Running it without any preparation work will shrink the VDI a bit, too insignificant to even notice.

And so I used SDelete to zero all the unused space on the VDI, and ran VBoxManage again. SDelete needs to be run inside the virtual machine while it’s running.

sdelete -c d:

I managed to get the 74GB VDI to shrink to 23GB. Now that’s a significant reduction in size.

Still, I was greedy. I wanted to know whether fragmentation has any effect on the shrink-ability of the VDI. So I went into the virtual machine, ran defrag, ran sdelete, then I executed VBoxManage to compact the VDI.

Below was my final result. From 74GB to 5.1GB I was fully satisfied. I was also able to shrink the 11GB VDI that contains the OS to 9.7GB.

If you have questions/suggestions/feedback, please leave a comment.

Mac OS X: Modifying Stubborn Files Transferred From Windows

This is related to the previous post, where I had a lot of checked out Subversion working copies in my disk. They came from a Windows machine I used before I bought myself a Mac.

For your information, in a Subversion working copy, there will always be a hidden folder named .svn in each directory, and a bunch of files in them. Many files in there are read-only on Windows, and on UNIX or Mac systems they have read permissions set (-r–r–r–). They are supposed to be that way and only a Subversion client can work on them.

When attempting to update my working directory, my Subversion client refused to update the files because it can’t write to .svn/entries

Tested on: Snow Leopard 10.6.6
Known to work as early as: Tiger 10.4.x

The issue is not related to permissions or even Subversion. For some kind of unknown reasons, when read-only files are transferred from Windows, there is a special flag set on Mac OS X – the user immutable flag. When this happens, you will be receiving these:

$ chmod u+w entries 
chmod: Unable to change file mode on entries: Operation not permitted

As root:

$ sudo chmod u+w entries
Password:
chmod: Unable to change file mode on entries: Operation not permitted

However, root can delete the files. But I don’t want the files to be deleted. I merely wanted to update (and later add new and modified files to the repository) my working copy.

The simple solution to this is to use the chflags command to unset the user immutable flag:

$ chflags -R nouchg *

As simple as that, and you will be able to operate on the files again. In my case, my “svn update” operation went as smooth as silk.

Remember, the permissions of the file does not even matter. Even if it’s world-writable -rwxrwxrwx

For the record, I transferred the file via a USB drive (NTFS file system), and I have received reports that this is the same case if you transfer from a file share (Samba or Windows File Sharing).

I hope this saved you some time.

Starting Subversion Service on Demand in Mac OS X

Since I moved to a new home I didn’t let my Linux servers run 24/7 so that I can save on electricity bills. It’s not so much about moving homes but it’s about the tariff increase. My 500W and 400W power supplies can easily reach the max usage of around 300W each which translates to around 432kWh per month, costing me around RM123.55 (source: TNB Tariff). Money that can be better spent for my gadgets, craft items for my wife, or toys for my kid.

The last time my Subversion repositories were used, was in Feb 2009. Since the repositories are just files, I can easily transfer them to my Mac to use locally. For me, file history and ability to revert changes are more important that using the repository as backup. My Mac is backed up using Time Machine anyway so I am pretty much safe. I am obsessed with file history and proper branching in source code, sometimes I think I have a mild version of OCD. Seriously.

OK, now on to the technical part. I am unsure on how my machine is pre-installed with CollabNet’s version, but you can install it on your Mac using one of the available packages listed in Apache’s official Subversion packages list.

Tested on: Snow Leopard 10.6.6
Known to work as early as: Tiger 10.4.x

My version:

svn, version 1.6.5 (r38866)
   compiled Jun 24 2010, 17:16:45
 
Copyright (C) 2000-2009 CollabNet.
Subversion is open source software, see http://subversion.tigris.org/
This product includes software developed by CollabNet (http://www.Collab.Net/).

Please take note that the method I am going to show here is to allow access to Subversion as a service via the network. I like to prepare for future use for example allowing access from other machines. You can always opt for local file based access, http, https, and svn+ssh (and you will not need to do the steps below).

On Mac, you can have services launched as a permanent process or on demand using launchd – System wide and per-user daemon/agent manager.

In this discussion we will be running svnserve on demand, similar to running services via inetd on Linux.

It is fairly straightforward. You need to create a .plist file similar to the one below. I named mine org.apache.subversion.svnserv.plist

1
2
3
4
5
6
7
8
9
10
11
12
13
14
15
16
17
18
19
20
21
22
23
24
25
26
27
28
29
30
31
32
33
34
35
36
37
38
39
40
41
42
43
44
45
46
< ?xml version="1.0" encoding="UTF-8"?>
< !DOCTYPE plist PUBLIC "-//Apple Computer//DTD PLIST 1.0//EN" 
"http://www.apple.com/DTDs/PropertyList-1.0.dtd"> 
<plist version="1.0">
<dict>
    <key>Debug</key>
    <false />
    <key>Disabled</key>
    <false />
    <key>GroupName</key>
    <string>staff</string>
    <key>Label</key>
    <string>org.apache.subversion.svnserv</string>
    <key>OnDemand</key>
    <true />
    <key>Program</key>
    <string>/usr/bin/svnserve</string>
    <key>ProgramArguments</key>
    <array>
        <string>svnserve</string>
        <string>--inetd</string>
        <string>--root=/Users/adyromantika/SVNRepository</string>
    </array>
    <key>ServiceDescription</key>
    <string>SVN Code Version Management</string>
    <key>Sockets</key>
    </dict><dict>
        <key>Listeners</key>
        </dict><dict>
            <key>SockFamily</key>
            <string>IPv4</string>
            <key>SockServiceName</key>
            <string>svn</string>
            <key>SockType</key>
            <string>stream</string>
        </dict>
    <key>Umask</key>
    <integer>2</integer>
    <key>UserName</key>
    <string>adyromantika</string>
    <key>inetdCompatibility</key>
    <dict>
        <key>Wait</key>
        <false />
    </dict>
</plist>

Things that need to be changed:

  1. Line 17: /usr/bin/svnserve needs to be changed to reflect your local installation.
  2. Line 22 needs to be changed to use your own repository root. This is not the name of the folder with “conf”, “db”, etc. folders but one folder up, so that your svnserve can serve multiple repositories.
  3. Line 11 is where you need to put the group name you want the svnserve process to run as. As you can see, I am lazy so I used the default group “staff”.
  4. Line 41 is where you need to put the username of you want the svnserve process to run as. I used my own user id which is not the best security practice but as I mentioned earlier, I am lazy.

Now that it’s done, copy the file to /Library/LaunchDaemons/ and run the command:

sudo launchctl load /Library/LaunchDaemons/org.apache.subversion.svnserv.plist

You are all set. Please note that since it’s launched on demand, you will not see the svnserve process running unless you are connected to the repository. You can simply use telnet to verify you get some kind of response:

adymac:~ adyromantika$ telnet localhost 3690
Trying 127.0.0.1...
Connected to localhost.
Escape character is '^]'.
( success ( 2 2 ( ) ( edit-pipeline svndiff1 absent-entries commit-revprops depth log-revprops partial-replay ) ) )

If you don’t get a response or “Unable to connect to remote host” you may want to check the file /etc/services and see whether these two lines are commented:

svn     3690/udp    # Subversion
svn     3690/tcp    # Subversion

Good luck. If you are having issues please comment below and I will try my best to help.

SMTP Smart Host Setup for Postfix in Snow Leopard

snow-leopard

PHP does not have any SMTP authentication mechanism in its configuration, and most developer opt for PEAR packages to perform email sending via custom ports and SMTP authentication.

I am one of those who will avoid using external packages as much as possible unless really necessary, and of course because I wanted a quick solution to my problem (or an excuse to be lazy).

By default, PHP sets SMTP as localhost and port 25. Under normal circumstances, this should be no issue as the built in Postfix will just connect to the destination server and delivers the mail. However, if your ISP blocks outgoing packets to port 25, the mail will go nowhere.

1. Enabling Postfix on Snow Leopard

Postfix is not enabled by default. You may choose to run it by default on system startup.

$ sudo vi /System/Library/LaunchDaemons/org.postfix.master.plist

Add before the closing </dict> tag:

  <key>RunAtLoad</key>
  <true />
  <key>KeepAlive</key>
  <true />

Start Postfix:

sudo launchctl
launchd% start org.postfix.master

You can test by using telnet on port 25 if you speak SMTP protocol.

2. Configuring Postfix to use a Smart Host

A smart host is also called a relay. This means that you need an SMTP account somewhere in the Internet to send the mail for you. With spam problems, open relays are identified in databases and are blocked by destination servers, so this means that legitimate mail servers requires authentication.

I used my Yahoo! SMTP account to help me send my test emails. Yahoo! allows for PLAIN authentication. The not so good thing about this method is that your password is transmitted plain text.

GMail is more secure and requires TLS authentication and this requires postfix to have SSL support but since I need this quick I have no time to research and find out whether it is. (Excuses, excuses).

i. Create a storage file for the password, for example /etc/postfix/relay_passwd

plus.smtp.mail.yahoo.com USERNAME:PASSWORD

ii. Secure the config file

$ sudo chmod 600 /etc/postfix/relay_passwd

iii. Create the hash database for postfix

$ sudo postmap /etc/postfix/relay_passwd

iv. Configure /etc/postfix/main.cf:

relayhost = [plus.smtp.mail.yahoo.com]:587 
smtp_sasl_auth_enable = yes  
smtp_sasl_password_maps = hash:/etc/postfix/relay_passwd  
smtp_sasl_security_options =

v. Restart Postfix

sudo launchctl
launchd% stop org.postfix.master
launchd% start org.postfix.master

You should be all set. Test sending an email from PHP.

BTW, if you’re wondering, if you are a Yahoo! Mail web user, chances are that you don’t have SMTP access. However, I have heard that some countries still do have free SMTP access for now.

Connecting to Exchange using Entourage via Outlook Web Access

I wanted to be able to use my personal laptop to check my work email, so that I don’t have to carry around the 3kg DELL beast all the time. Sure, I can use the Blackberry but typing long emails on it can prove painful especially with fat fingers.

I have VPN access, but Cisco (official) VPN client keeps on and on causing my Snow Leopard to crash (kernel panic). The built in VPN client used to work until some security changes were made to the VPN concentrators.

Googling around I found a helpful hint, to set up my Entourage to connect to my work email via the Internet (not having to connect via VPN).

entourage-exchange

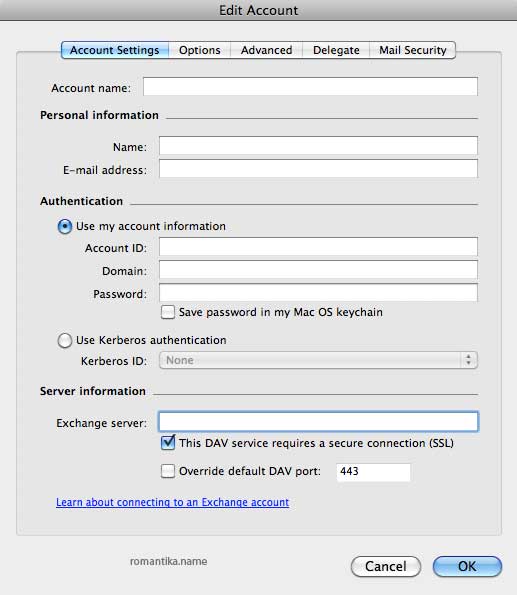
All of the fields are self explanatory, but one field was the problem: “Exchange Server”.

If your organization has a “OWA” or Outlook Web Access, you can try entering <servername>/exchange/<your_full_email> into the field and see whether it works. For example if your OWA is owa.romantika.com and your full email is [email protected] you would use:

owa.romantika.com/exchange/[email protected]

One thing I have not figured out yet, is whether or not my organization has public facing LDAP server (for address lookups). Since this is not a standard configuration, the server names are unpublished anywhere. But since it’s available I guess it’s not against the rule.

Hope this helps. I can now check my emails from my Entourage, but that’s it. No VPN access.

BTW I think you can use the same technique with an installation of Microsoft Outlook too!