Training Materials

Due to popular demand, I have created a page in my home server for you to browse through the training materials / courseware I have created at http://ady.homelinux.net/training/

There you can browse through all of the slides I have created for training sessions. You can’t download them unless you want to capture the screen individually – I exported my PowerPoint presentations to be able to be viewed using an application written in Macromedia Flash. Someone named emre was nice enough to put in the source of his Flash application, and I have modified it to suit my needs 😉

Please take note, that however I will have to shut down my home server if I leave home for more than one day. Oh yes, please bear with the speed as it’s only a normal ADSL line after all. I can’t put the materials on my current hosting as I am running out of space. 🙁 Anyone wants to donate disk space or hosting?

*Macromedia Flash is a registered trademark of Macromedia.
*PowerPoint is a registered trademark of Microsoft Corporation.

Cooler Disk

My journey to Low Yat plaza last weekend (or was it the weekend before that?) was worth it. I installed new disk brackets and fans to cool off my system and the temp actually dropped quite significantly:

Disk 1
Disk 2

Cooler disks! 🙂

*The fluctuation you see is because I can’t keep my air conditioner turned on 24 hours a day 🙁

Radeon IGP on HP nx9010

I just spent a few hours trying to find out what the problem is with my Debian. I just replaced Fedora Core 3 to Debian unstable on my notebook. It’s a HP nx9010, equipped with Radeon IGP:

0000:01:05.0 VGA compatible controller: ATI Technologies Inc Radeon IGP 340M

There was no video from noatun and xine. After some googling around I found that my DRI is not working. Great.

However, all is fine now. I found this great site http://www.nixnuts.net/files/README.txt

Basically what I have to do was add these to my /etc/apt/source.list:

deb http://www.nixnuts.net/files/ ./
deb-src http://www.nixnuts.net/files/ ./

and do this:

# apt-get -u install xlibmesa-gl1-dri-trunk

This fixes everything, even the annoying flickers on my screen on high resolutions. Now I can enjoy 1280×1024 on external monitor! 😀

Good job John Lightsey, thanks a bunch!

p/s – Somehow I find that Debian runs faster on my laptop compared to Fedora. 😐

Note: This effectively changes your X server to Xorg instead of XFree86.

APC UPS

For the last few months, our office building has been doing a lot of generator testing and sometimes these tests went out of schedule. We began to worry about the office servers, as constant power failures may cause data corruptions although we use reiserfs for all of the disks.

My colleague and I look for good UPSes, and found out that APC’s UPSes work very well for Linux machines. After some price and Linux research, we decided to buy some APC Back-UPS CS 650. These models are not intended to be used by high-end server products but since we only have some clone machines as servers, a couple of HP Proliant DL140, and a DELL PowerEdge 1425SC there shouldn’t be much problem.

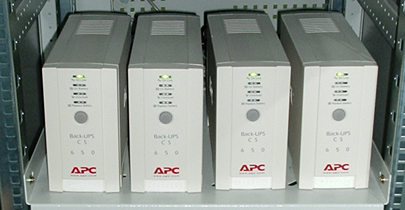
We bought 7 units of them from Startec in Low Yat, for RM320 each. We took a few hours last Saturday to install them and rearrange our servers. 4 of them are placed inside the server rack:

4 UPSes - 3 x HP Proliant DL140, 1 x DELL PowerEdge 1425SC

On the server side, we install Debian’s package apcupsd, and on the monitoring server (with Apache) we installed apcupsd-cgi. To make it work, /etc/apcupsd/apcupsd.conf are edited with the following lines modified:


CABLETYPE usb
UPSTYPE usb
DEVICE

Our UPS came with USB cables, different cables requires different configuration line for CABLETYPE. Don’t worry the explanations in the configuration files are very good.

Next, a couple of tests were done with apcupsd to make sure the servers behave well in case of power failures. When we are satisfied, the monitoring part is easy enough – add the monitored hosts inside /etc/apcupsd/hosts.conf. Here’s a snapshot of the monitoring page:

Multimon

Local APT Repository: Part 2

Final Steps on Server

What we did in part 1 was to sync the repository. Now we need to make sure that our APT Server can serve the files for use by client machines.

For this purpose, you can either choose to export the filesystem using NFS, or using Samba. I chose NFS. In the server’s /etc/exports:

THE_PATH_WHERE_YOU_SAVED (ro,all_squash,anonuid=65534,anongid=65534)

Please make sure that you have nfs-user-server installed, and run /etc/init.d/nfs-user-server restart

Mounting on Client Machines

Now, we need to configure the machines that are going to use this repository. On the machine’s /etc/fstab put in this line:

NAME_OR_IP_OF_APTSERVER:THE_PATH_WHERE_YOU_SAVED /mnt/debian-apt nfs defaults 0 0

Don’t forget to:

# mkdir /mnt/debian-apt

To mount it:

# mount /mnt/debian-apt

Next, we need to reconfigure your APT by editing /etc/apt/sources.list:

deb file:/mnt/debian-apt/ stable main contrib non-free

*If you like, you can also put in lines for your apt to use the testing or unstable dists.

Updating APT on Client Machines

To test:

# apt-get update

Don’t worry if not much info is displayed. The next time you want to upgrade or install packages, you should see that it needs to download 0B of packages, looks something like this:

2 upgraded, 6 newly installed, 0 to remove and 467 not upgraded.
Need to get 0B/2399kB of archives.

***Don’t forget to change the variables written using UPPERCASE above to the values corresponding to your installations!

Good luck! 😉

EV1SERVERS

Just a short review on EV1SERVERS:

Customer Support

Last Thursday I had to contact EV1 customer support to change passwords for the member section. They are very helpful, and fast. The online chat system also works great. Everything was done within 30 minutes.

Server Order

We planned to upgrade one of our Celeron server, which was obtained in 1999. And then we decided to remove it, and order a dual Xeon 3.2 instead. The thing that really amaze me is that when ordering the new server, we took these steps:

  1. Add new server
  2. Select specs
  3. Specifiy root password
  4. Confirmation page
  5. DONE!

About five minutes after that, we received an IP number. The server was online!!! Cool. Everything took us about 10 minutes, and we had a new server – ready for operations.

Some other FREE services that I really like

  • Access to serial console using SSH client
  • Reboot via web system

Keep up the good work, EV1!

BTW, we ordered a dual Xeon 3.2GHz server, with 2GB RAM, and 2 x 73GB SCSI disks – running Red Hat Enterprise Linux 3. Monthly bandwidth limit is 2500GB. I asked for Debian, but they don’t install Debian on their servers… The cost is USD399.00 per month.

I know EV1 was supporting the SCO againts Linux efforts… but what the heck… 😉

New Monitor

Although I rarely go for used products, this time I can’t let go of the deal. I just acquired a 19″ monitor – Samsung SyncMaster 955DF from a colleague leaving for the Philippines. How much? RM150.00

This model is not the best out there, but it’s really worth the price. 🙂

Viewsonic 91f+

I bought a Viewsonic 91f+ 19″ monitor for my office a few months ago for almost RM1,000.00. Today we found it dead! Nothing is displayed on the screen except for a bright line in the middle.

Don’t buy this monitor!!! 🙁

Local APT Repository: Part 1

If you have a bunch of Debian machines to be taken care of, you must have been using APT a lot. APT is incredible, but if you use it to update multiple machines, you’ll be bored to death waiting each and individual machine to download packages. What if I tell you there’s a way we can download once, use multiple times? That’d be great, wouldn’t it?

Prerequisites

  • A machine with at least 20GB disk space (to be the repository server) – http://www.debian.org/mirror/size
  • rsync (to sync with the repository)
  • Port 873 opened in the firewall (for rsync to access Debian mirrors)

Preparing the server

First, you need to download the script http://www.debian.org/mirror/anonftpsync

Change the following variables in the script:

  • TO : put in the path where you want to save your repository
  • RSYNC_HOST : put the mirror closest to you (http://www.debian.org/mirror/list-full)
  • EXCLUDE : put in the architectures that are useless for you. In my case, I exclude all architecture except for i386

Make the directory you specified in TO variable above.

Next, test your script:

# sh anonftpsync

If you can see the files being downloaded in the file rsync.log generated by the script, it is working. Go have a coffee or a nap, as the first sync takes a lot of time 🙂

If you have verified that all files have been downloaded properly, save the script to /usr/local/sbin/anonftpsync

Don’t forget to:

# chmod 755 /usr/local/sbin/anonftpsync

Automating download

This is just the matter of asking cron to do the job for you, say at 6.30am everyday:

30 6 * * *              /usr/local/sbin/anonftpsync

You are done! Now your ‘APT Server’ will sync itself with the chosen mirror everyday. In the next part of this article we’ll configure a machine to utilize this server.

Linksys WRT54G

I’ve just upgraded my WRT54G firmware to v3.03.6 HyperWRT_2.1b1 created by Timothy Jans. Previously, with the default firmware provided by Linksys (v3.03.6) the router frequently hangs. Now, it is rock stable.

Read more about this firmware at http://www.hyperwrt.org

As I search for the solution of the problem, I also stumbled upon a great site, dedicated to the particular router: http://www.wrt54g.com

Kudos to Timothy Jans!