 The current “stable†distribution of Debian GNU/Linux is version 4.0r0, codenamed etch. It was released on April 8th, 2007.
Testing is now codenamed lenny. Release notes here.
The current “stable†distribution of Debian GNU/Linux is version 4.0r0, codenamed etch. It was released on April 8th, 2007.
Testing is now codenamed lenny. Release notes here.
Have you ever heard of the browser named Iceweasel? Of course not, if you’re not using Debian. One of my machine at home is running a Debian Etch installation (my torrent box), and a few days ago I ran apt-get upgrade to upgrade the packages.
I was quite annoyed at first, as it’s trying to install a new package (not to mention the huge size) but I let it anyway. Earlier today I launched the web browser in my Xfce and Iceweasel was loading…
Iceweasel is a rebranded Firefox, and exist in 2 independent projects: one by Gnuzilla, and the other one by Debian.
Iceweasel was created since Mozilla demanded that Debian complies to some of the policies and terms that Debian finds unacceptable.
The other products are also re branded. Thunderbird became Icedove and Seamonkey became Iceape.
The current release of Gnuzilla IceWeasel is based on the 1.5.0.7 version of Mozilla Firefox, while the current version of Debian Iceweasel is based on the 2.0.0.1 release of Firefox.

The most obvious reason for this name change was that Mozilla demanded that Debian retain all branding from Mozilla if they were to continue using the Firefox name. However, because of the Debian Free Software Guidelines that said no non-free artwork and plugins are allowed, they were unable to comply. This generic, non-branded icon on the right was used for Firefox in Debian.
What I can see so far is that only the name changed. All of my plugins can still be used and upgraded normally. As for my active machines, however I always use the extracted package from Mozilla so there would be no way I would realize about the existence of Iceweasel.
Iceweasel. Cute name?
Finally, Skype has released a beta version with alsa support: 1.3.0.30_API
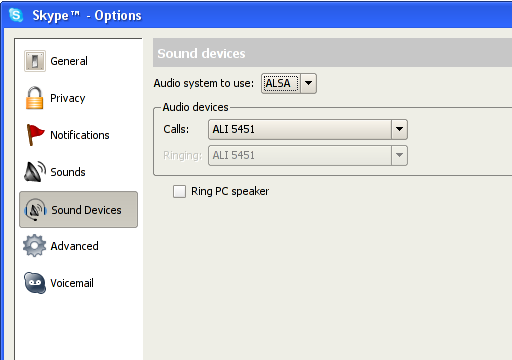
Hopefully all the troubles with “Problem with Sound Device” will be history. However for users with very old kernels, and prefer to use OSS, the option is still there. The problem with Skype utilizing OSS on modern systems is that it keeps on failing to close /dev/dsp after using it. The only way to make it work again is to restart Skype. It’s a hassle and a headache. Believe me, I used to be a SysAdmin (until a week ago) for a 99.99% Linux desktop company – with Skype as one of the primary communication tools.
I was compiling and installing jabberd2 on a server at office and everything went great except for one thing: no initscript provided. I was baffled to find out that the great software didn’t have any initscript. So I wrote one:
1 2 3 4 5 6 7 8 9 10 11 12 13 14 15 16 17 18 19 20 21 22 23 24 25 26 27 28 29 30 31 32 33 34 35 36 37 38 39 40 41 42 43 44 45 46 47 48 49 50 51 52 53 | #! /bin/sh # # Script to start/stop jabberd2 on a Debian # # by Ady Romantika, 23 August 2005 # DAEMON=/usr/local/bin/jabberd NAME=jabberd2 DESC=jabberd2 JABBERUSER=jabber # Uncomment if needs debugging DEBUG="-D" # PID files base locations PIDBASE=/usr/local/var/jabberd/pid case "$1" in start) echo -n "Starting $DESC: " su $JABBERUSER -c "/usr/local/bin/jabberd $DEBUG &" echo "$NAME." ;; stop) echo -n "Stopping $DESC: " if [ -e $PIDBASE/router.pid ]; then su $JABBERUSER -c "kill -9 `cat $PIDBASE/sm.pid`" echo "$NAME." else echo "jabberd2 is not started." fi # Delete the PID files as jabberd does not do this automatically rm -rf $PIDBASE/router.pid \ $PIDBASE/resolver.pid \ $PIDBASE/sm.pid \ $PIDBASE/s2s.pid \ $PIDBASE/c2s.pid ;; restart) $0 stop sleep 3 $0 start ;; *) N=/etc/init.d/$NAME echo "Usage: $N {start|stop|restart|reload|force-reload}" >&2 exit 1 ;; esac exit 0 |
The script might work with other distributions with minor modifications. 🙂
jabberd is one of the many server softwares for the popular jabber open instant messaging protocol. If you need logging for your jabber server, you might be interested in Bandersnatch provided by Funky Penguin.
Update: 31 August 2005
There’s an rc script provided for jabberd2, but it is written with Fedora in mind. The script is more complicated, and probably is better. I didn’t have the time to check it out yet. You can download it at http://www.jabberstudio.org/cgi-bin/viewcvs.cgi/jabberd2/tools/
Be careful when you are feeling like doing an apt-get upgrade today.
My whole KDE menu at work went missing after doing an upgrade… LOL!

This bug has been reported: http://bugs.debian.org/cgi-bin/bugreport.cgi?bug=323747
The buggy version is 3.4.2-1 so for now, downgrade to 3.3.2-6.1 🙂
I just spent a few hours trying to find out what the problem is with my Debian. I just replaced Fedora Core 3 to Debian unstable on my notebook. It’s a HP nx9010, equipped with Radeon IGP:
0000:01:05.0 VGA compatible controller: ATI Technologies Inc Radeon IGP 340M |
There was no video from noatun and xine. After some googling around I found that my DRI is not working. Great.
However, all is fine now. I found this great site http://www.nixnuts.net/files/README.txt
Basically what I have to do was add these to my /etc/apt/source.list:
deb http://www.nixnuts.net/files/ ./ deb-src http://www.nixnuts.net/files/ ./ |
and do this:
# apt-get -u install xlibmesa-gl1-dri-trunk |
This fixes everything, even the annoying flickers on my screen on high resolutions. Now I can enjoy 1280×1024 on external monitor! 😀
Good job John Lightsey, thanks a bunch!
p/s – Somehow I find that Debian runs faster on my laptop compared to Fedora. 😐
Note: This effectively changes your X server to Xorg instead of XFree86.
         (__)
         (oo)
   /------\/
  / |    ||
 *  /\---/\
    ~~   ~~
....''Have you mooed today?''...
Final Steps on Server
What we did in part 1 was to sync the repository. Now we need to make sure that our APT Server can serve the files for use by client machines.
For this purpose, you can either choose to export the filesystem using NFS, or using Samba. I chose NFS. In the server’s /etc/exports:
THE_PATH_WHERE_YOU_SAVED (ro,all_squash,anonuid=65534,anongid=65534)
Please make sure that you have nfs-user-server installed, and run /etc/init.d/nfs-user-server restart
Mounting on Client Machines
Now, we need to configure the machines that are going to use this repository. On the machine’s /etc/fstab put in this line:
NAME_OR_IP_OF_APTSERVER:THE_PATH_WHERE_YOU_SAVED /mnt/debian-apt nfs defaults 0 0
Don’t forget to:
# mkdir /mnt/debian-apt |
To mount it:
# mount /mnt/debian-apt |
Next, we need to reconfigure your APT by editing /etc/apt/sources.list:
deb file:/mnt/debian-apt/ stable main contrib non-free |
*If you like, you can also put in lines for your apt to use the testing or unstable dists.
Updating APT on Client Machines
To test:
# apt-get update |
Don’t worry if not much info is displayed. The next time you want to upgrade or install packages, you should see that it needs to download 0B of packages, looks something like this:
2 upgraded, 6 newly installed, 0 to remove and 467 not upgraded. Need to get 0B/2399kB of archives. |
***Don’t forget to change the variables written using UPPERCASE above to the values corresponding to your installations!
Good luck! 😉
If you have a bunch of Debian machines to be taken care of, you must have been using APT a lot. APT is incredible, but if you use it to update multiple machines, you’ll be bored to death waiting each and individual machine to download packages. What if I tell you there’s a way we can download once, use multiple times? That’d be great, wouldn’t it?
Prerequisites
Preparing the server
First, you need to download the script http://www.debian.org/mirror/anonftpsync
Change the following variables in the script:
Make the directory you specified in TO variable above.
Next, test your script:
# sh anonftpsync |
If you can see the files being downloaded in the file rsync.log generated by the script, it is working. Go have a coffee or a nap, as the first sync takes a lot of time 🙂
If you have verified that all files have been downloaded properly, save the script to /usr/local/sbin/anonftpsync
Don’t forget to:
# chmod 755 /usr/local/sbin/anonftpsync |
Automating download
This is just the matter of asking cron to do the job for you, say at 6.30am everyday:
30 6 * * * /usr/local/sbin/anonftpsync |
You are done! Now your ‘APT Server’ will sync itself with the chosen mirror everyday. In the next part of this article we’ll configure a machine to utilize this server.
To Debian junkies out there, Debian 3.1 codenamed ‘Sarge’ has been declared stable on 6th of June 2005. Read more about it here: http://www.debian.org/News/2005/20050606